


2) Press and hold the clock symbol key during entire time setting procedure.
a) Press the Day key to bring the actual day of the week into display.
b) Press the h button to set the hours and the m button to set the minutes. If the keys are depressed for
more than a second, the digits will advance rapidly.
c) Release the clock key when finished with the settings. The colon between the hours and minutes will
be flashing indicating the timer has started.
Programming
1) To set the Timer to start the engine once a week and run for a selected period of time.
Press Timer once (do not keep depressed) The display will show “1ON and “--:--“for the time.
a) Press h+ m+ to set the ON time.
b) Press Day to select the day of the week to run.
c) Press Timer key to enter program. The display will show 1”OFF”.
d) Program OFF command using steps b-d above.
e) Press the key to return to time od day display.
2) To review the programming
a) Press Timer key to review the individual commands as preprogrammed, at any time, be brought
consecutively into the display for revision or checking. Revisions are carried out by writing over the
existing programs using the steps outlined above.
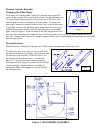
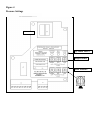
5. Set Control Settings – also see attached drawing for locations of items 5 through 11.
a. Set the pressure switch start time delay (P/SWT DELAY SEC) on the Main Logic Board. The
adjustment range is 0 to 15 seconds in 1 second increments.
b. Set the AC Power Loss Delay Time on the Main Logic Board. The adjustment range is 0 to 90
seconds in 6 second increments.
c. Set the Auto Stop time switch (SW6). Settings are none, 15 minutes or 30 minutes.
d. Set the AC PowerLoss Start switch (SW4–2). Setting is on or off.
e. Set the AC Loss Audible Alarm switch (SW4-1). Setting is on or off.
6. Controller Testing
a. Verify pressure is above the Stop setting.
b. Turn CONTROLLER ON / OFF SWITCH to the ON position
Check the Test Timer to make sure that the Timer contacts are not about to close. Closure of the Timer
contacts during testing causes incorrect results.
Manual Start
a. Turn the AUTOMATIC / MANUAL SWITCH to the MANUAL position.
b. Operate the MANUAL CRANK # 1 switch or the MANUAL CRANK # 2 switch. Release as soon as the
engine starts.