


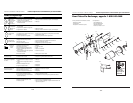

25 Sp
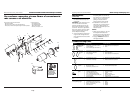
Lista De Repuestos
No. de Número
Ref. Descripción de Pieza Ctd.
1 Anillo de seguridad -- 1
2 Arandela ▲ 1
3 Ensamblaje de la tapa de aire DH795200AV 1
(Incluye el artículo 1)
4 Anillo retención ▲ 1
5 Boquilla de fluído DH795300AV 1
6 Cuerpo de la pistola No se aplica 1
7 Tuerca del empaque de fluido,
9 mm Hex. ▲ ■ 1
8 Empaque de fluído ▲ ■ 1
9 Ensamblaje del control de patrón DH751800AV 1
10 Perilla de control de fluído ● 1
11 Resorte del sistema de control ▲ ● 1
de fluído
12 Aguja de fluído PH01700AV 1
13 Cuerpo, control de fluido 8 mm Hex. ● 2
14 Anillo en O ▲ ● ◆ 2
15 Tapa de la válvula de aire ◆ 1
16 Resorte de la válvula de aire ▲ ◆ 1
17 Ensamblaje de la válvula de aire ◆ 1
18 Cuerpo de la válvula de aire, ◆ 1
6 mm Hex.
19 Empaque de la válvula de aire ▲ ◆ 1
20 Tuerca del empaque de la ▲ ◆ 1
válvula de aire
21 Entrada de aire 6,4 mm (1/4”) NPS, DH795400AV 1
15 mm Hex.
22 Tapón de aire DH795500AV 1
23 Entrada de fluído, 9,5 mm DH795600AV 1
24 Gatillo DH753300AV 1
25 Travesaño del gatillo ▲ 1
26 Empaque en E ▲ 1
27 Filtro a presión PH015800AV 1
28 Ensamblaje de la tapa de gravedad PH015900AV 1
29 Tuerca de la tapa ▼ 1
30 Tapa a presión ▼ 1
31 Tapa del sistema de ventilación ▼ 1
32 Cuerpo del sistema de ventilación ▼ 1
33 Gancho para colgar la unidad PH016400AV 1
JUEGOS DE PIEZAS DISPONIBLES PARA LA REPARACIÓN
Y EL MANTENIMENTO
▲ Empaques/reacondicionamiento DH750100AV 1
● Empaques de fluído DH750200AV 1
■ Mecanismo de control de fluído DH750300AV 1
◆ Válvula de aire DH750400AV 1
▼ Ensamblaje de la tapa del envase PH016600AV 1
Nécessaire de capuchon d’air
d’aiguille/buse de 1,6 mm DH790100AV 1
Juego de tapa de prueba HVLP
de 1,4 mm DH790200AV 1
Juego de tapa de prueba HVLP
de 1,6 mm DH790300AV 1
No. de Número
Ref. Descripción de Pieza Ctd.
Operating Instructions and Parts Manual
HVLP Gravity Feed Spray Gun
Preparation (Cont.)
paint.
5. The fluid control knob can be used
to finely adjust pattern consistency.
Before spraying the workpiece, practice
a few minutes on a cardboard target to
ensure the pattern size and consistency
are set correctly.
Operation
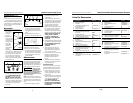
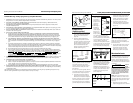
1. Begin spraying. Always keep the
gun at right
angles to the
work (See
Figure 8).
2. Keep the noz-
zle about 6 to 9
inches from the
work surface
throughout the
stroke and
always keep
the gun in
motion while
spraying.
Stopping gun movement in mid-
stroke will cause a build up of paint
and result in runs. Do not fan the
gun from side to side while paint-
ing. This will cause a build-up of
paint in the center of the stroke
and an insufficient coating at each
end (See Figure 9).
3. Trigger the gun properly. Start the
gun moving at the beginning of the
stroke BEFORE SQUEEZING THE
TRIGGER and release the trigger
BEFORE STOPPING GUN MOVE-
MENT at the end of the stroke. This
procedure will feather (blend) each
stroke with the next without show-
ing overlap or unevenness (See
Figure 10).
4. The amount of paint being applied
can be varied by the speed of the
stroke, distance from the surface
and adjustment of the fluid control
knob.
5. Overlap strokes just enough to
obtain an even coat (See Figure 11).
NOTE: Two thin coats of paint will
yield better results and have less
chance of runs than one heavy layer.
6. Use a piece of cardboard as a shield
to catch overspray at the edges of
the work to protect other surfaces.
Use masking tape to cover other
areas if needed.
Maintenance
DAILY CLEAN-UP
Local codes may require specific clean-
ing methods and equipment. Follow
local codes and paint manufacturer’s
recommendations for the use and dis-
posal of spray materials and solvent.
Clean spray gun
immediately after
use. Paint and other materials dry
quickly in the small passages rendering
gun useless due to the difficulty of
removing hardened paint from the pas-
sages inside the gun.
NOTE: In the instructions below, the
use of the word “solvent” refers to the
specific solvent for the material used
(example: lacquer thinner for lacquer,
etc.).
1. Remove and empty the canister;
NOTICE
then rinse with a solvent recom-
mended for the paint or other
material used.
2. Refill canister with clean solvent
and attach to the gun. Spray solvent
through the gun while shaking the
gun vigorously. Wipe the gun exte-
rior with a solvent soaked rag.
Repeat until the gun is clean.
3. Remove the air cap and soak in sol-
vent until clean. Use a small brush
for stubborn stains if necessary.
Toothpicks or small brushes may be
used to clean air passages; however,
NEVER USE METAL OBJECTS TO
CLEAN PRECISELY DRILLED
PASSAGES. DAMAGED PAS-
SAGES WILL CAUSE IMPROPER
SPRAYING.
4. Clean gaskets with a solvent soaked
rag. To prevent equipment damage,
DO NOT IMMERSE GASKETS OR
SPRAY GUN BODY IN
SOLVENTS.
5. After using water to clean out
water based paints or materials,
spray mineral spirits through the
gun to prevent corrosion.
6. Use a non-silicone oil on all moving
parts when reassembling. Use
Vaseline
®
or light grease on all
threaded connections prior to
storage.
7. Clean and flush gun thoroughly to
neutralize any contaminants corro-
sive to the spray gun.
PERIODIC CLEAN-UP
Due to improper cleaning and paint it
may be necessary to inspect and clean
the internal parts and the gun body.
1. Examine openings in air cap and
fluid tip. If clogged, remove any o-
rings and soak the air cap or fluid
tip in solvent.
2. A brush or toothpick or something
similar may be used to dislodge the
dried paint from holes and pas-
sages. NEVER USE METAL
OBJECTS TO CLEAN PRECISELY
DRILLED PASSAGES. DAMAGED
PASSAGES WILL CAUSE IMPROP-
ER SPRAYING.
Figure 11
6 - 9”
Figure 8
Thin coat Thin coat
Heavy coat
Figure 9
INCORRECT
6 - 9”
Pull
Trigger
Start
Stroke
Release
Trigger
End
Stroke
Figure 10
4
Manual de Instrucciones y Lista de Piezas
Pistola Pulverizadora HVLP Alimentada por Gravedad