


24 Sp
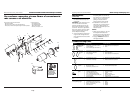
1
2
3
4
5
6
7
8
9
10
11
12
14
15
17
18
19
20
23
26
27
28
29
30
31
32
14
33
13
16
24
25
21
22
HVLP Test Cap Kit
Kit de test de
capuchon HVLP
Juego de tapa de
prueba HVLP
Para ordenar repuestos, sírvase llamar al concesionario
más cercano a su domicilio
Sírvase darnos la siguiente información:
- Número del modelo
- Número de Serie o código con fecha (de haberlo)
- Descripción y número del repuesto según la lista de repuestos
Puede escribirnos a:
The Campbell Group
Attn: Parts Department
100 Production Drive
Harrison, OH 45030 U.S.A.
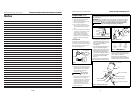
Maintenance
(Continued)
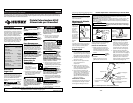
3. Remove and check the fluid needle
for excessive wear at the tip and
straightness.
IMPORTANT: If the needle tip is worn
more on one side than the other,
either the needle is bent or the gun
body has been dropped or knocked
out-of-line. There are no adjustments
that can be made to a bent gun body.
Test the needle by rolling on a flat
surface. Replace if necessary.
4. Check and replace any damaged o-
rings and seals. O-rings and seals
can be wiped clean but not soaked
in solvent.
5. Unscrew packing nuts and replace
the packing ONLY if a leak will not
stop when the nut is tightened (See
Figure 5). Do not over-tighten a
packing nut because this will
restrict movement of the needle.
6. Re-assemble in reverse order of
above and use a non-silicone oil on
moving parts. Apply Vaseline
®
or
light grease on threaded joints and
hose connections.
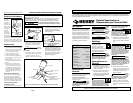
STORING
1. When not using spray gun, turn the
fluid adjustment knob counter-
clockwise to open which will reduce
spring tension on needle fluid tip.
2. Spray gun MUST BE well cleaned
and lightly lubricated.
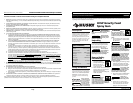
Operating Instructions and Parts Manual
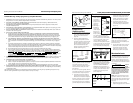
HVLP Gravity Feed Spray Gun
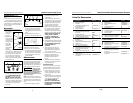
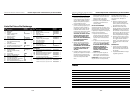
Right or left
heavy spray
pattern
Top or bot-
tom heavy
spray pat-
tern
Split spray
pattern
Center
heavy spray
pattern
Sputtering
spray
Fluid leaking from packing
nut
Air leaking from air cap
without pulling trigger
Troubleshooting Chart
Symptom Possible Cause(s) Corrective Action
1. Holes in left or right side of the air
cap are plugged
2. Dirt on left or right side of fluid tip
1. Dried material at top or bottom of
fluid tip
2. Loose air cap or dirty seat
3. Air cap plugged
1. Fan pattern open too far
2. Fluid turned in too far
3. Atomization air too high
1. Fan adjustment partially closed
2. Material too thick
3. Atomization pressure too low
1. Material level too low
2. Container tipped too far
3. Loose fluid inlet connection
4. Loose or damaged fluid tip/seat
5. Dry or loose fluid needle packing nut
6. Air vent clogged
1. Packing nut loose
2. Packing worn or dry
1. Sticking air valve stem
2. Contaminate on air valve or seat
3. Worn or damaged air valve or seat
4. Broken air valve spring
5. Bent valve stem
1. Clean. Use only non-metallic point
2. Clean
1. Clean
2. Clean and tighten
3. Clean. Use only non-metallic point
1. Partially close the pattern adjustment
2. Increase fluid
3. Reduce atomization air pressure
1. Open fan pattern adjustment
2. Thin to proper viscosity
3. Increase atomization pressure
1. Refill
2. Hold more upright
3. Tighten
4. Adjust or replace
5. Lubricate and or tighten
6. Clear vent hole
1. Tighten, but do not restrict needle
2. Replace or lubricate (non-silicone oil)
1. Lubricate
2. Clean
3. Replace
4. Replace
5. Replace
5
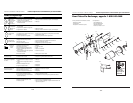
Manual de Instrucciones y Lista de Piezas
Pistola Pulverizadora HVLP Alimentada por Gravedad