


Installation Roadmap 1
Chapter 1
Planning an Installation
This chapter provides an overview of IDP configuration options. This chapter has
the following sections:
Installation Roadmap on page 1
IDP Configuration Basics on page 2
Installation Roadmap
This section provides a high-level roadmap of an IDP sensor installation. With each
step is a reference to more information.
1. Install the NetScreen-Security Manager (NSM) server onto a dedicated host or
hosts. See the NetScreen-Security Manager Installation Guide for installation
instructions.
2. Install the NSM GUI on a Windows or Linux client machine. See the
NetScreen-Security Manager Installation Guide for installation instructions.
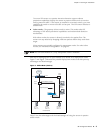
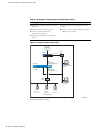
3. Decide on a place in your network for the sensor. Choose which mode you will
run. See Chapter 4, “Installing the Sensor,” on page 17.
4. Install the sensor on a rack. See Chapter 4, “Installing the Sensor,” on page 17.
5. Log into the sensor using the console port to run the EasyConfig script. This
script lets you specify a sensor mode, IP address, netmask, default gateway,
and date or time. See “Using the Console Serial Port to Configure the Sensor”
on page 22. You can use the default login name (root) and password (abc123)
for the sensor.
6. (Optional) If you want to change your default login and password, change port
speeds, or do more advanced configuration of the sensor, use a Web browser
to log into the sensor’s Appliance Configuration Manager (ACM). You can reach
it by typing
https://SensorIPAddress in the Address or Location box of your
browser.
7. Start the NSM GUI. The default login ID is super. Use the password you
specified when you installed the NSM server.