


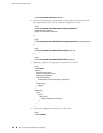
Step 2: Prepare for Front or Center Mounting
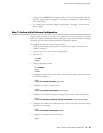
The cable management system organizes and supports the PIC cables to prevent
damage. The mounting brackets are shipped installed in the front-mounting position,
but must be removed to install the cable management system.
1. Attach an electrostatic discharge (ESD) grounding strap to your bare wrist and
connect the strap to one of the ESD points on the chassis.
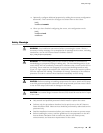
2. Use a number 2 Phillips screwdriver to remove the screws from the front and
rear of the mounting brackets on the chassis. Remove the mounting brackets.
3. Locate the cable management racks and appropriate screws in the accessory
box.
4. Slide the cable management racks into the slots at the front of the chassis.
5. Use a number 2 Phillips screwdriver to tighten the screws that secure the cable
management system to the chassis.
6. Reinstall the mounting brackets.
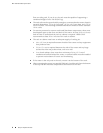
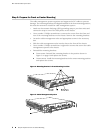
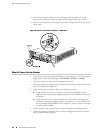
■ Front-mount: Reinstall the mounting bracket in the position shown in
Figure 2 on page 6 and replace the screws.
■ Center-mount: Install the mounting brackets in the center-mounting position
and replace the screws.
Figure 2: Mounting Bracket in Front-Mounting Position
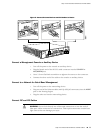
Figure 3: Cable Management System
6 ■ Step 2: Prepare for Front or Center Mounting
M7i Internet Router Quick Start