


Connecting the Device to a Network
NetScreen-ISG 2000 25
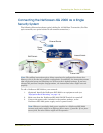
Connecting the NetScreen-ISG 2000 as a Single
Security System
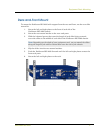
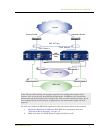
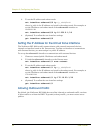
The following illustration shows typical cabling for 10/100 Base-T networks. (For fiber
optic networks, use optical cables for all network connections.)
To add a NetScreen-ISG 2000 to your network:
1. (Optional) Install the NetScreen-ISG 2000 in an equipment rack (see
“Equipment Rack Mounting” on page 14).
2. Make sure that the NetScreen-ISG 2000 ON/OFF switch is turned off.
3. Connect the power cable, included in the product package, to the
NetScreen-ISG 2000 power supply and to a power source.
Note: The cabling instructions given below reproduce the configuration shown here.
However, this is not the only possible configuration. In addition, the instructions assume
that all physical ports and interfaces are still set at their default settings. If you have
changed the port and interface configurations, the instructions below might not work
properly.
Note: Whenever you deploy both power supplies in a NetScreen-ISG 2000,
connect each power supply to a different power source, if possible. If one power
source fails, the other source might still be operative.
DMZ LAN
Trusted LAN
Power
Cable
External Router
Internal Switch
DMZ Switch
Internet