10
USE SETTING
TROUBLE?
PREPARE
IMPORTANT
Make sure all the devices and the monitor are turned off.
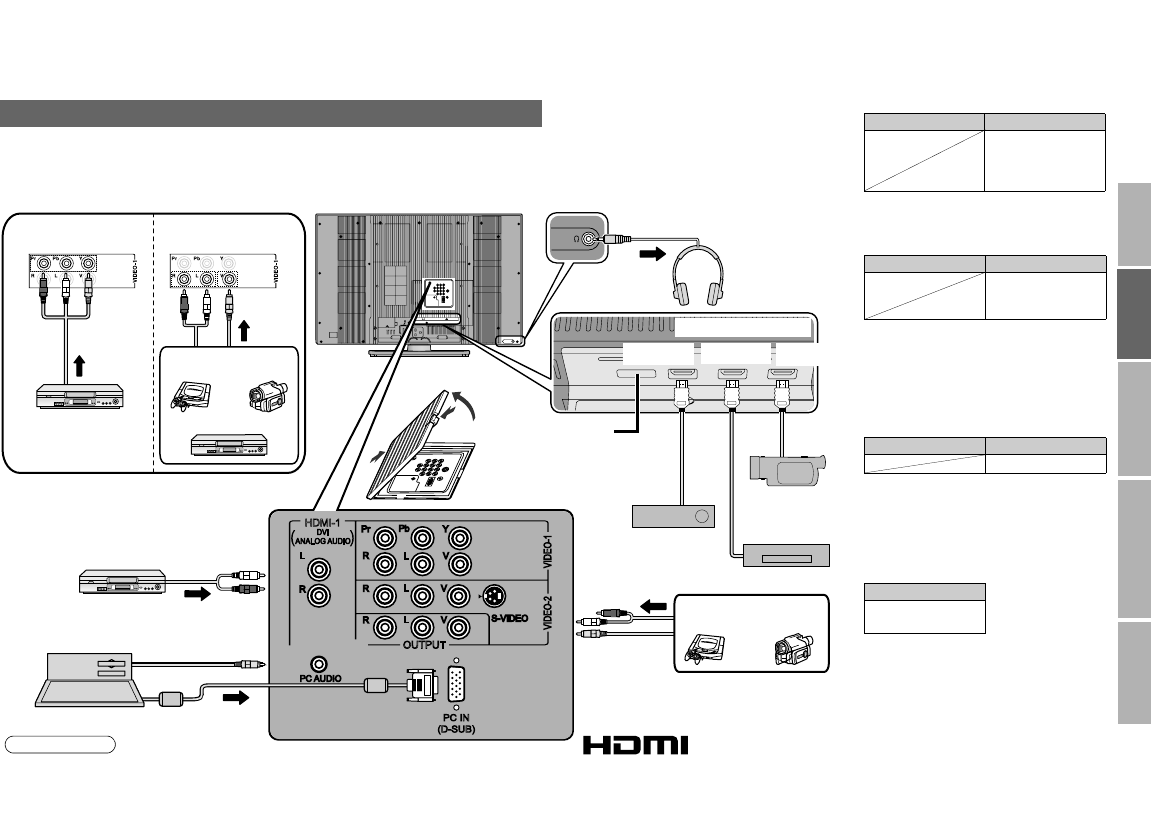
You can connect many different devices to the rear panel of the monitor.
Please read the user manuals of each device before setting up.
(Connecting cables are not supplied with this monitor.)
Connecting your external devices
JVC
Pr
Pb
Y
R
L
R
L
V
R
L
V
R
L
V
S-VIDEO
VIDEO-2 VIDEO-1
PC AUDIO
PC IN
(D-SUB)
OUTPUT
HDMI-1
JVC
Component input
DVD Player
HDMI-1 HDMI-2 HDMI-3
DVD player
(HDMI compatible)
Not available.
(For service adjustments)
Digital Satellite
broadcast tuner
HD Video
camera
DVD player
To VIDEO-2
Game
consoles
Video
camera
PC input line in
PC
Composite input
Game
consoles
Video
camera
VCR
g
: signal direction
Headphones
A
B
C
HDMITM ConnectorHDMIீ Connector
z To reduce noise, use a VGA cable with core filters.
Note
z Use component signal
g “VIDEO Setting” (P. 21)
z If both composite and S-VIDEO cables
are connected, S-VIDEO input takes
priority over composite inputs.
z “HDMI-1 Audio Setting” g (P.21)
z HDMI-2 and HDMI-3 inputs do not support
analog sound.
OUTPUT
Video and sound signals of a monitor channel
you are viewing output from these terminals
ⅥDVI devices
g“Connect DVI devices”
(P. 25)
VIDEO-1
Watching videos
Output j Input h
• Composite signal /
Component signal
(P. 27)
• Sound L / R
VIDEO-2
Watching videos
Output j Input h
• Composite signal /
S-VIDEO
• Sound L / R
HDMI-1
HDMI-2
HDMI-3
Connecting HDMI
devices
Output j Input h
• HDMI signal (P. 27)
Output j
• Composite signal
• Sound L / R
HDMI, the HDMI Logo and High-Definition Multimedia
Interface are trademarks or registered trademarks of
HDMI Licensing LLC.
GD-463D10U_EN.book Page 10 Monday, June 8, 2009 4:20 PM


