


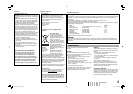
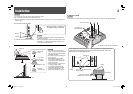
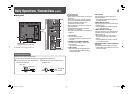
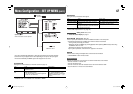

23 4 5 6 7 9 p1 8
6
4 VOLUME –/+ ( / ) buttons*
2
Adjusts the volume.
5 MENU button
Displays the MAIN MENU.
• To display the SET UP MENU, press
button while pressing MENU button.
• For the menu operations, see page 7.
6 SCAN SIZE button/lamp
Selects the screen size when VIDEO 1 or
VIDEO 2 is selected for the input.
• Each time you press the button, the screen
size changes as follows:
• When “NARROW” is selected, the lamp
lights.
• When “NARROW” is selected, black bars
appear on the top and the bottom of the
screen because the aspect ratio of the LCD
panel is 5:4.
• This setting is not available for signals from
a computer is selected for the input.
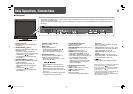
Daily Operations / Connections
7 Front panel
• “NO EFFECT” is displayed when you press a button which is not available for the current input or signal format (the lamp lights even when the
function does not actually work).
• The items controlled by the MAKE system cannot be controlled by the buttons on the front panel (“REMOTE ON” is displayed and the lamps
do not light).
1 Speaker (monaural)
The speaker emits the audio signal for the
selected input.
2 CHROMA/PHASE ( ) button*
1
Displays the adjustment bar for the picture
color density or hue.
• Each time you press the button, the
adjustment for chroma and phase changes.
• To adjust, press or (
4) button.
• The adjustment is memorized for each
Picture Mode (
7).
3 CONTRAST/BRIGHT ( ) button*
1
Displays the adjustment bar for the picture
contrast or brightness.
• Each time you press the button, the
adjustment for contrast and brightness
changes.
• To adjust, press or (
4) button.
• The adjustment is memorized for each
Picture Mode (
7).
7 PICTURE MODE button/lamp
Selects the Picture Mode.*
3
STD.: Normal picture
DARK ENHANCED: Makes the dark parts of
the picture clear.
VIVID: Makes the picture vivid.
DYNAMIC: Makes the picture bright.
• When “DARK ENHANCED, “VIVID,” or
“DYNAMIC” is selected, the lamp lights.
• When RGB or DVI is selected for the input,
the Picture Mode is fixed to “STD.”
• When “DYNAMIC” is selected, high
luminance parts of pictures may not be
displayed properly. In this case, select
another Picture Mode.
8 INPUT SELECT buttons/lamps
Selects an input.
VIDEO 1: VIDEO 1 IN or Y/C terminal
VIDEO 2: VIDEO 2 IN terminal
RGB: RGB terminal*
4
DVI: DVI-D terminal
• The lamp for the selected input lights.
9 Power lamp
Unlit: The monitor is completely off (the AC
plug is not connected).
Lights in Green: The monitor is on or in the
Gray Back mode (☞ “NO SYNC ACTION” in
“SYNC FUNCTION” on page 12).
Lights in orange: The monitor is off (on
standby).
Flashes in orange: The monitor is in the
Power Save mode (☞ “NO SYNC ACTION” in
“SYNC FUNCTION” on page 12).
p button
Tur ns on and off (on standby) the monitor.
*
1
When a menu screen or adjustment bar is displayed,
these buttons work as / to select an item.
*
2
When a menu screen or adjustment bar is displayed,
these buttons work as / to adjust the item or
select an option.
*
3
To reset the adjustments for each Picture Mode, see
“Resetting the Picture Mode” (☞ page 7).
*
4
Before using this input, perform “AUTO ADJUST” (☞
“AUTO ADJUST” on page 10).
The illustration of the monitor is of LM-H191.
LMH191&171EA_EN.indd 6LMH191&171EA_EN.indd 6 08.7.8 5:40:19 PM08.7.8 5:40:19 PM