


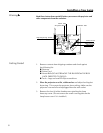


Supply a.c. power of the rated voltage and frequency. The power con-
sumption is about 1.5KW. The power line must be capable of handling
the total current for the entire system. Cables must be connected tightly.
(120V - 12.5 amp, 220V- 6.25 amps).
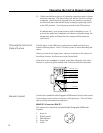
1. Place the projector on a flat, stable surface and adjust the leveling
feet by turning. This prevents the projector from rocking.
2. Make sure that the power on/off switch is in the OFF position, then
plug the power cable into the power connector and tighten.
3. Turn the power on/off switch to ON . Note: the green power
indicator should be lit.
4. Turn the round operating switch to the fan position. The blower fan
will start.
5. Turn the projector on by rotating the operating switch to the lamp
on position. The lamp should start to glow. It will take a few
seconds to come to full brilliance. If you hear a clicking sound, but
the bulb fails to strike, check to make sure that the positive wire is
securely tightened down and that there is no leakage to the ground.
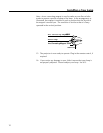
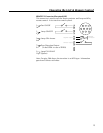
6. Load the projector with a slide tray. Align the 0 position of thetray
with the slide gate. Hold the select lever and check that the tray can
be rotated smoothly with your hand.
7. To advance the tray, press the slide forward button once, then the
tray will advance by one step to the 1 position.
8. To move the tray backward, press the slide reverse button once, then
the tray will move backward by one step.
9. Connect your remote control device for remote operation.
10. To remove the slide tray, hold down the select button, rotate the
slide tray with your hand and bring the 0 position of the tray to the
slide gate. Lift the slide tray.
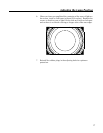
11. To focus the slide picture, turn the focus knob on the projector or
press focus on your remote control device.
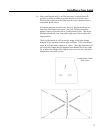
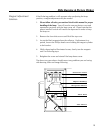
12. Tilting, or the adjustment of optical axis, is done by adjusting the
four adjustable legs at the corners of the projector.
Power Supply
Operating the Unit & Remote Control
13
Projection