


A-61578 September 2006 11
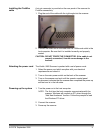
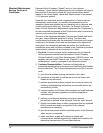
Installing the FireWire
cable
A six-pin connector is provided on the rear panel of the scanner for
FireWire connectivity.
1. Plug the end of the cable with the right angle into the scanner.
2. Connect the other end of the cable into the 1394a card outlet in the
host computer. Be sure that it is installed correctly and properly
seated.
CAUTION: DO NOT FORCE THE CONNECTOR. If the cable is not
properly connected, it could cause damage to the
scanner.
Attaching the power cord The Kodak i1860 Scanner is packed with a set of power cords.
1. Select the power cord which complies with your electrical
requirements and attach it.
2. Turn on the main power switch on the back of the scanner.
3. Turn on the scanner and wait until the operator control panel
touchscreen indicates that the scanner has completed the power-up
self-test and is in the idle state.
Powering up the system 1. Turn the power on to the host computer.
NOTE: The first time the host computer communicates with the
scanner, Windows will request an STI driver through the
“Add New Hardware” function. Follow the prompts to load
the Windows STI driver.
2. Connect the scanner.
3. Power up the scanner.