


SERVICE MANUAL
22 30APR96 – SM4530-1
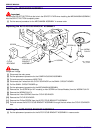
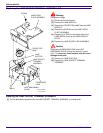
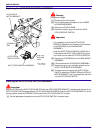
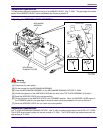
Replacing the AUTO-FOCUS SWITCH ASSEMBLY
Warning
Dangerous Voltage
[1] Disconnect the main power.
[2] Do the replacement procedure for the LOWER
HOUSING ASSEMBLY.
[3] Remove the FOCUS KNOB.
[4] Remove the short, gray wire from the AUTO-
FOCUS DEFEAT SWITCH.
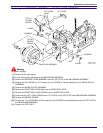
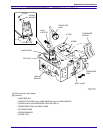
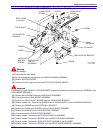
Important
• It is necessary to push the AUTO-FOCUS
BRACKET backward and forward to allow access
to the SCREWS on the LENS MOUNT
ASSEMBLY.
• Keep the AUTO-FOCUS SWITCH LEVER that is
connected to the AUTO FOCUS SWITCH so you
can install it on the new AUTO FOCUS SWITCH.
[5] Remove the 3 SCREWS from the LENS MOUNT
ASSEMBLY.
[6] Lift and remove the LENS MOUNT ASSEMBLY.
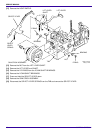
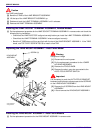
[7] Remove the gray, red, and black wires from the
AUTO FOCUS SWITCH ASSEMBLY.
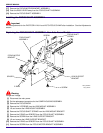
[8] To disconnect and remove the AUTO FOCUS
SWITCH, bend the LOCKING TAB on the FOCUS
MOTOR BRACKET until it is aligned with the hole
in the AUTO FOCUS SWITCH.
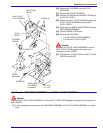
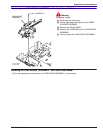
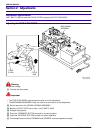
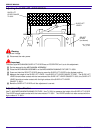
Installing the AUTO-FOCUS SWITCH ASSEMBLY
Important
Align the 2 TABS on the AUTO-FOCUS SWITCH with the FOCUS MOTOR BRACKET, checking that the end of the
AUTO-FOCUS LEVER engages with the CYCLE SOLENOID PLUNGER. After the AUTO-FOCUS SWITCH is in the
correct position, bend the LOCKING TAB to hold the AUTO FOCUS SWITCH in place.
[1] Do the replacement procedure for the AUTO-FOCUS SWITCH in reverse order.
A091_4028GA
wires
and black
grey, red,
A091_4028GCA
SWITCH LEVER
AUTO FOCUS SWITCH ASSEMBLY
TAB
LOCKING
AUTO FOCUS
MOTOR BRACKET
AUTO FOCUS