


9
Slide Tray Installation
Slide Tray Set-Up
This system was designed to permit usage of prepared
presentations without reorientation of the slides in the
tray.
Your new Navitar VideoMate will accept Kodak Ektapro
80, Kodak Ektagraphic 80 for holding 80 slides with a
maximum slide mount thickness of 3.2mm and Kodak
Carousel Transvue 140 Slide Tray for holding 140 slides
with a maximum mount thickness of 1.6mm. We recom-
mend the 80 slide tray more maximum reliability.
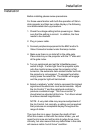
For those setting up a new tray and/or presentation:
1. Arrange your slides in the order you wish them to
appear in the presentation. Orient them such that they
are upright and reading correctly from left to right.
2. Rotate each slide to turn the image upside down (do
not turn the slide over). Mark a sequential number in
the upper right corner of each slide (this will be ex-
tremely useful should the slides become mixed). Use
a felt tipped market rather than a label that will be
loosened by the heat.
3. Make sure the bottom metal plate on the slide tray is
indexed into the “0” position (the plate will not rotate
with respect to the top tray). Remove the top lock ring
by rotating it counterclockwise.
4. Insert slide number 1 into slot “1”. The number written
on the upper right corner of each slide should be at the
top and facing the next higher numbered slot. Load all
slides and replace and lock the top lock ring.
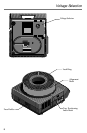
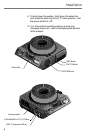
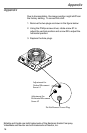
Slide Tray Installation
1. Center the tray over the post of the projector.
2. Gently rotate the tray until the “0” slide slot is at the
index mark and the tray will drop into position. If the
tray doesn’t drop into position, check if the lower metal
plate is located in the zero position (rotate until it
locks).