


bizhub C203/C253/C353 2-91
Setup items by operation
2
For Remote Printer mode with NetWare 4.x bindery emulation
0 Before using bindery emulation, check that bindery emulation is compatible with the NetWare server.
1 From a client computer, log in to NetWare with the Administrator permission as Bindery.
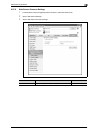
2 Start up Pconsole.
3 From the "Available Options" list, select "Quick Setup".
4 Press the [Enter] key.
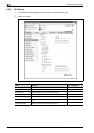
5 Enter the appropriate names in the "Print Server Name", "Printer Name", and "Print Queue Name"
fields.
6 Select "Other/Unknown" from the "Printer type" field.
7 Save the specified settings.
8 Press the [Esc] key to quit Pconsole.
9 Use the NetWare server console to load PSERVER.NLM.
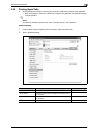
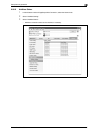
10 Specify the following settings for "NetWare Setting".
For the print server mode with NetWare 4.x bindery emulation
0 Before using bindery emulation, check that bindery emulation is compatible with the NetWare server.
0 To use the printer server mode, the IPX protocol must be loaded on the NetWare server.
1 From a client computer, log in to NetWare with the Administrator permission as Bindery.
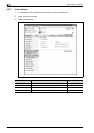
2 Start up Pconsole.
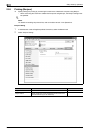
3 From the "Available Options" list, select "Quick Setup".
4 Press the [Enter] key.
5 Enter the appropriate names in the "Print Server Name", "Printer Name", and "Print Queue Name"
fields.
6 Select "Other/Unknown" from the "Printer type" field.
7 Save the specified settings.
8 Press the [Esc] key to quit Pconsole.
9 Specify the following settings for "NetWare Setting".
Item Definition Prior confirmation
IPX Setting* Select "ON".
Ethernet Frame Type* Specify the frame type to be used. Frame type
NetWare Print Mode* Select "NPrinter/Rprinter".
Print Server Name* Specify the printer server name to allow it to serve as Nprint-
er/Rprinter (up to 63 characters).
Print server name regis-
tered in step 4
Printer Number* Enter the Nprinter/Rprinter printer number.