


KRAMER: SIMPLE CREATIVE TECHNOLOGY
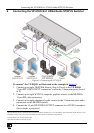
Connecting the VP-81KSi 8x1 UXGA/Audio STEP-IN Switcher
16
You can configure RS-232-2 port command macros to send any data on one of the
two possible triggers:
• The “Device startup” trigger. This trigger is generated when one or more
signals are detected on any of the inputs and can be used for example, to
activate a projector connected to the output of the VP-81KSi
• The “Device inactivity” trigger. This trigger is generated when there is no
signal detected on any input during the inactivity timeout period (which is set
using the K-Config software to be between 0 and 180 minutes). This trigger
can be used for example, to deactivate a projector connected to the output of
the VP-81KSi
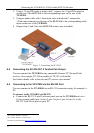
6.9 Connecting to the VP-81KSi via the Ethernet Port
You can connect the VP-81KSi via the Ethernet in the following ways:
• For direct connection to the PC, use a crossover cable (see
Section 6.9.1
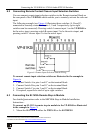
• For connection via a network hub or network router, use a straight through
cable (see
)
Section 6.9.2
Note: The following instructions are valid only if your PC uses a fixed IP address.
If your PC receives an IP address from a DHCP server, consult your IT department
regarding a suitable IP address.
)
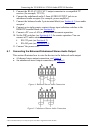
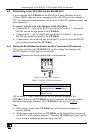
6.9.1 Connecting Directly to the Ethernet Port
You can connect the Ethernet port of the VP-81KSi to the Ethernet port on your
PC via a crossover cable with RJ-45 connectors.
This type of connection is recommended for identification of the factory
default IP address of the VP-81KSi during the initial configuration
To connect the VP-81KSi directly to a PC:
1. Using a crossover cable, connect the VP-81KSi to the PC via the Ethernet
port on both units.
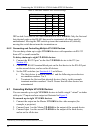
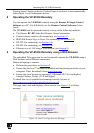
2. On the PC, click Start > Control Panel.
3. Double-click Network Connections.
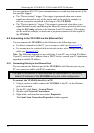
4. Right-click, and from the menu select Properties.
The Local Area Connection Properties window appears.