


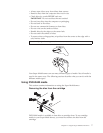
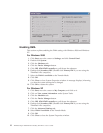

Loading a disc
1. Press the Eject button. The tray slides out of the drive.
2. Place a disc in the tray with the label facing up.
3. Close the tray by gently pushing the tray in until it latches.
Attention: Do not use force or insert foreign objects to open the tray. If your tray does not
open when you press the Eject button, see “Manually ejecting a disc” for more information.
Securing a disc in a vertically mounted drive
The drive has four retainers molded into the loading tray for vertical mounting
operation. To insert a disc, place it in the lower two retainers before closing the
tray. To remove a disc, open the tray and lift the disc from the two lower retainers.
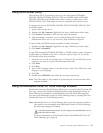
Manually ejecting a disc
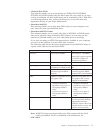
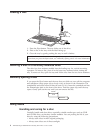
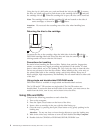
If you press the Eject button and the tray does not slide out, turn off the computer
and straighten a large paper clip to form a tool, as shown in the illustration. The
straightened end must extend at least 45 mm (1.8 in.). Insert the extended end into
the manual-eject hole on the front of the drive. Push the paper clip until the tray
opens. Gently pull out the tray until you can remove the disc.
45 mm
1.8 in
Using media
Handling and caring for a disc
Carefully handle and clean discs, especially writable media types such as CD-R
and CD-RW discs, so that they remain readable. You can prolong the life of your
discs by using the following precautions:
v Always store discs in their original packaging.
v Always store discs out of direct sunlight.
6 ThinkPad Super Multi-Burner Ultrabay Slim Drive: User’s Guide