Scanning to an FTP address using a shortcut number
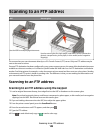
1 Load an original document faceup, short edge first into the ADF or facedown on the scanner glass.
Note: Do not load postcards, photos, small items, transparencies, photo paper, or thin media (such as magazine
clippings) into the ADF. Place these items on the scanner glass.
2 If you are loading a document into the ADF, then adjust the paper guides.
3 From the printer control panel, press the Scan/Email button.
4 Press the arrow buttons until FTP appears, and then press .
5 Press , and then enter the recipient's shortcut number.
6 Press 1 to enter another shortcut or press 2 to end the shortcut entry.
After you press 2, Press Start To Begin appears.
7 Press to send a black-only copy or to send a color copy.
Creating an FTP shortcut using the Embedded Web
Server
1 Type the printer IP address into the address field of your Web browser.
Note: If you do not know the IP address of the printer, then print a network setup page and locate the IP address
in the TCP/IP section.
2 Click Settings.
3 Under Other Settings, click Manage Destinations.
Note: A password may be required. If you do not have an ID and password, then contact your system support
person.
4 Click FTP Shortcut Setup.
5 Select the scan settings (Format, Content, Color, and Resolution).
6 Enter a shortcut number, and then click Add.
If you enter a number that is already in use, you are prompted to select another number.
Scanning to an FTP address
109


