


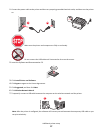


Before you install the printer on a wired network, make sure that:
• You have completed the initial setup of the printer.
• The printer is connected to your network with the appropriate type of cable.
For Windows users
1 Insert the Software and Documentation CD.
Wait for the Welcome screen to appear.
If the CD does not launch after a minute, then do the following:
a Click , or click Start and then click Run.
b In the Start Search or Run box, type D:\setup.exe, where D is the letter of your CD or DVD drive.
2 Click Install Printer and Software.
3 Click Agree to agree to the License Agreement.
4 Select Suggested, and then click Next.
Note: To configure the printer using a static IP address, using IPv6, or to configure printers using scripts, select
Custom and follow the instructions on the computer screen.
5 Select Wired Network Attach, and then click Next.
6 Select the printer manufacturer from the list.
7 Select the printer model from the list, and then click Next.
8 Select the printer from the list of printers discovered on the network, and then click Finish.
Note: If your configured printer does not appear in the list of discovered printers, click Add Port and follow the
instructions on the computer screen.
9 Follow the instructions on the computer screen to complete the installation.
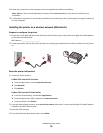
For Macintosh users
1 Allow the network DHCP server to assign an IP address to the printer.
2 Print the network setup page from the printer. For information on printing a network setup page, see “Printing a
network setup page” on page 24.
3 Locate the printer IP address in the TCP/IP section of the network setup page. You will need the IP address if you
are configuring access for computers on a different subnet than the printer.
4 Install the drivers and add the printer.
a Install a PPD file on the computer:
1 Insert the Software and Documentation CD in the CD or DVD drive.
2 Double-click the installer package for the printer.
3 From the Welcome screen, click Continue.
4 Click Continue again after viewing the Readme file.
5 Click Continue after viewing the license agreement, and then click Agree to accept the terms of the
agreement.
6 Select a Destination, and then click Continue.
7 From the Easy Install screen, click Install.
Additional printer setup
31