


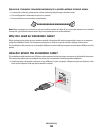

Using the printer locally (USB)
If the printer is currently set up for wireless
1
Attach one end of a USB cable to the USB port on the back of the printer. Attach the other end to a USB port on
the computer.
2 Add the printer:
In Mac OS X version 10.5
a From the Apple menu, choose System Preferences.
b Click Print & Fax under the Hardware section.
c Click +.
d Select the printer from the list and click Add.
In Mac OS X version 10.4 or earlier
a From the Finder desktop, choose Go > Utilities.
b Double-click Print Center or Printer Setup Utility, depending on the operating system version you are using.
The Printer List dialog appears.
c Choose the printer you want to use.
d Click Add.
The Printer Browser appears.
e Select your printer.
f Click Add.
3 A second print queue will be created. Remove the wireless queue if you do not want to switch back to accessing
the printer over a wireless connection.
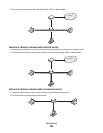
Sharing a printer in a Windows environment
1 Prepare the computers to share the printer:
a Make all computers printing to the printer accessible through Network Neighborhood by enabling File and
Print Sharing. See the Windows documentation for instructions on enabling File and Print Sharing.
b Install the printer software on all computers that will print to the printer.
2 Identify the printer:
a On the computer that is attached to the printer, do one of the following:
1 Click , or click Start and then click Run.
2 In the Start Search or Run box, type control printers.
3 Press Enter, or click OK.
The printer folder opens.
b Right-click the name of your printer.
c Click Sharing or Printer Properties.
d From the Sharing tab, select Share this printer or Shared as, and then assign a distinctive name.
e Click OK.
Networking
99