


3 Select your printer from the list.
Note: To identify your printer, print a network setup page, and then look for “Fully Qualified Domain Name” in
the TCP/IP section.
4 Click Next > Close.
5 Depending on your device, do either of the following:.
• Press and hold the printer you want to configure.
• Right‑click the printer you want to configure.
6 From the menu that appears, select Scan Properties or Properties, and then change the settings as necessary.
7 From the printer control panel, touch Scan to Computer and then select from the following options:
• Scan—Scan and save the document directly to a selected location on the computer.
• Scan for Print—Scan and automatically print the document.
• Scan for E‑mail—Attach a scanned document to an e‑mail.
• Scan for Fax—Attach a scanned document to be sent through fax.
8 Touch Send It.
Remote scan in progress appears on the printer display. The scanned image opens automatically on the
computer screen.
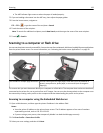
Scanning to a flash drive
1 Load an original document faceup, short edge first into the ADF tray or facedown on the scanner glass.
Notes:
• Do not load postcards, photos, small items, transparencies, photo paper, or thin media (such as magazine
clippings) into the ADF tray. Place these items on the scanner glass.
• The ADF indicator light comes on when the paper is loaded properly.
2 If you are loading a document into the ADF tray, then adjust the paper guides.
3 Insert the flash drive into the USB port on the front of the printer.
Note: The USB Drive home screen appears.
4 Select the destination folder, and then touch Scan to USB drive.
Note: The printer goes back to the home screen after 30 seconds of inactivity.
5 Adjust the scan settings, and then touch Scan It.
Scanning 134