


Repair Information 4-7
4097-00X
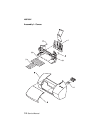
Power Connector Removal
1. Remove the front cover.
2. Remove the carrier frame.
3. Disconnect the power connector from the system board. Note
the routing of all cables.
4. Remove the screw from the power connector and remove the
power connector.
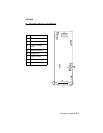
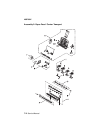
Printhead Carrier / Cable / Rod Removal
1. Remove the front cover.
2. Remove the carrier frame.
3. Disconnect the printhead carrier cables from the system board.
4. Remove the shaft retainers from the ends of the carrier rod.
5. Lift up on the right side of the carrier rod and slide it out the right
side of the machine.
Note:
The carrier is attached to the carrier belt between two raised
tabs on the belt. Be sure to note this location when reinstalling the
carrier.
6. Remove the carrier belt from the rear of the carrier.
7. Remove the carrier.
8. Depress and remove the printhead carrier cable retainer latch
located on the carrier frame.
9. Remove the carrier cable and latch.
10. Remove the home sensor screw from the rear of the carrier.
11. Remove the printhead cable retainer clip screw from the rear of
the carrier.
12. Depress the two clips on the top of the cradle assembly and
remove the front of the cradle assembly.
13. Remove the carrier cable and note the routing of the cable and
home sensor.
Note:
If there is any glue on the carrier rod retainer clips, reinstall
only one clip when replacing the carrier rod.