


5 Press the down arrow button until Units of Measure appears, and then press .
6 Press the down arrow button until appears next to the correct unit of measure, and then press .
Submitting selection appears, followed by the Universal Setup menu.
Specify the paper height and width
Defining a specific height and width measurement for the Universal paper size (in the portrait orientation) allows
the printer to support the size, including support for standard features such as duplex printing and printing multiple
pages on one sheet.
Note: Select Portrait Height to adjust the paper height setting or Paper Width to adjust the paper width
setting, or adjust both. Instructions to adjust both follow.
1 From the Universal Setup menu, press the down arrow button until Portrait Width appears, and then
press
.
2 Press the left arrow button to decrease the setting or the right arrow button to increase the setting, and then
press
.
Submitting selection appears, followed by the Universal Setup menu.
3 From the Universal Setup menu, press the down arrow button until Portrait Height appears, and then
press
.
4 Press the left arrow button to decrease the setting or the right arrow button to increase the setting, and then
press
.
Submitting selection appears, followed by the Universal Setup menu.
5 Press and release until Ready appears.
Specify a feed direction
Short Edge is the factory default setting for feed direction for Universal paper settings. The Feed Direction menu will
not appear from the Universal Setup menu unless Long Edge is an available setting. If necessary, specify whether the
short or long edge of the paper will enter the printer first.
1 From the Universal Setup menu, press the down arrow button until Feed Direction appears, and then
press
.
2 Press the down arrow button until Short Edge or Long Edge appears, and then press .
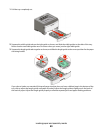
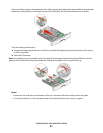
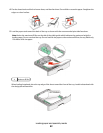
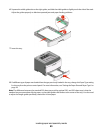
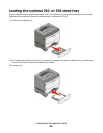
Loading the standard 250-sheet tray
The printer has two trays to select from: the standard tray (Tray 1), also known as the 250-sheet tray, and either the
optional 250-sheet tray or the optional 550-sheet tray (Tray 2). Only one optional drawer (which includes an optional
tray) may be attached to the printer at one time.
Notes:
• Proper paper loading prevents jams and facilitates trouble-free printing.
• Do not remove trays while a job prints or while Busy appears on the display. Doing so may cause a jam.
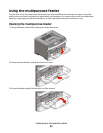
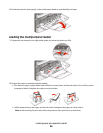
Loading paper and specialty media
39