7
To Replace the Battery:
1. Close active programs and turn off
computers. Turn OFF the UPS and unplug it
from mains supply.
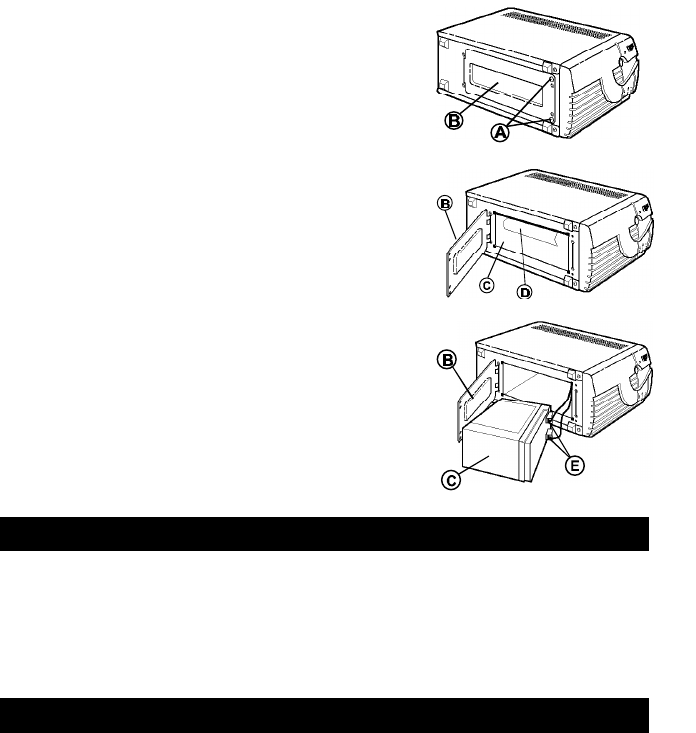
2. Place UPS on its side and remove retaining
screws (A) to battery door (B).
3. Open battery door (B) and remove the battery
(C) by pulling on the battery tab (D).
4. Remove terminal wires (E) from old battery.
Connect terminal wires (E) to new battery (C);
the red connects to the positive terminal, the
black connects to the negative. DO NOT
reverse terminal connections. Slide battery
(C) into unit, and close battery door (B).
Dispose of used battery properly (it contains
lead and acid).
5. Plug in UPS, turn it on, and charge batteries
for 8 to 10 hours.
RESETTING THE CIRCUIT BREAKER
If the UPS is overloaded, the circuit breaker (9) at the lower rear of the UPS
activates to protect the UPS. If the circuit breaker activates, its center bar will
extend. To reset the circuit breaker, simply push the bar back in. If the circuit
breaker activates often, ask your dealer to check the UPS sizing or call Tech
Support at the number listed at the end of this manual.
ALARM CONDITIONS
The 400 VA and 600 VA models sound alarms and flash visual indications at the
front panel LED's (2, 3, 4) whenever they sense a power failure, low battery
voltage (while on battery), an overload, or a mains overvoltage condition. The
250 VA model only sounds an alarm. Sometimes, a fault in your computer
equipment may cause an overload alarm. See following page for alarm
indications.
You may silence the On-Battery alarm on 400 VA and 600 VA models by
pressing the BATTERY TEST button (5), on the rear panel. You must turn off
your computer equipment and then turn off the UPS to silence an alarm on a 250
VA model.
Refer to the first table on the next page for recommended actions when alarms
occur. Check this table first before calling for assistance. It diagnoses and
solves common problems, and helps prevent potential problems.


