


User Manual English
- 3 -
Introduction
Thank you for purchasing the LINDY KVM Switch Pro USB 2.0 Audio. This
product is covered by a limited 2 Year warranty.
Pease read this manual carefully to fully understand all the functions and features
of this advanced USB KVM Switch.
This KVM Switch allows several USB enabled computers to be connected and
controlled from a single keyboard, monitor and mouse thereby reducing hardware
costs and maximising desk space.
Product Features
The LINDY KVM Switch Pro USB 2.0 Audio supports advanced features that allow
modern USB enabled computers such as PCs and Macs to connect and share
USB peripherals, such as printers, scanners, storage devices etc.
•
Supports USB mice and keyboards as well as USB 2.0 device sharing among
the connected computers
•
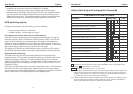
Computer port selection by any of the following:
o Front panel push buttons on the switch
o Keyboard Hotkey – configurable by the user
•
Audio support for microphone and speakers. Includes selectable switching
function which can be configured to exclude audio switching for uninterrupted
listening.
•
Built in 2 port USB 2.0 hub allows peripherals to be shared between the
connected computers. USB hub ports can be configured to be excluded from
switching when changing computers.
•
DVI-I and as VGA versions available, both with 2 or 4 ports and supplied with
KVM cables for connecting to the computers.
•
The DVI-I version uses advanced DVI-I technology for digital video as well as
analogue video signals via the DVI-I connector. Supports all digital DVI-D
Single Link resolutions up to 1920 x 1200, and analogue VGA resolutions up to
2048 x 1536.
Package contents
LINDY KVM Switch Pro USB 2.0 Audio
2 or 4 sets of KVM cables (depending on model) to connect the computers
Power supply
This manual
User Manual English
- 4 -
USB 2.0 Device Sharing
This KVM Switch provides USB keyboard and mouse ports as well as two USB 2.0 hub ports to
connect different USB 2.0 devices. The built in USB hub supports USB data rates of up to
480Mbps. The internal USB 2.0 hub ports also support the connection of an additional USB hub
allowing more that two devices to be connected to the KVM switch. USB devices can either be
switched together with the KVM function or configured to be excluded from switching.
Important Note: If you share USB Pen Drives, Card Readers or other memory devices, and
switch them between your computers, you must make sure that any current data transfer is
completed before you change channels. If you do not do this the active data transfer may be
interrupted and files may become corrupted or lost. To prevent such problems make sure that
any data transfer has completed or use the Windows or Mac function to remove the USB
hardware safely.
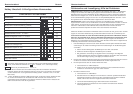
Installation
DVI version: If you wish to connect computers with both digital DVI-D and
analogue VGA signals then you will need to add the LINDY VGA to DVI Adapter
(Part No. 41223) to your graphics card. Please also ensure your monitor accepts
both digital and analogue signals. This KVM Switch does not convert the video
signal but only switches the analogue and digital signals. If your monitor has two
separate input connectors for analogue (VGA) and digital (DVI-D) signals then you
will require the LINDY Video Splitter Cable (Part No. 41219) to connect to your
monitor.
You can now install your LINDY KVM Switch Pro USB 2.0 Audio by following
the procedure as described below:
Step 1. Connect the power supply to the KVM switch before you connect any
other cables.
Step 2. Connect your keyboard, monitor and mouse to the USB and DVI ports on
the KVM switch labelled CONSOLE. Connect your speakers and microphone if
required.
Step 3. Connect your computers using the cables provided. Should you wish to
extend the operating distance then you may purchase suitable cables from
LINDY. Be advised that the maximum working distance for USB is 5m. If you
require a longer distance then please use the LINDY No. 42915 USB 2.0
Active Extension Cable (Part No. 42915).
Step 4. Turn on the power to all devices and computers.
Step 5. Your computer should now boot and detect the newly installed hardware.
A Windows operating system will detect and install multiple USB device drivers.
Please wait until this procedure has finally completed to ensure correct
operation. A Mac computer system may not identify a PC keyboard at the first
boot up and may show an identification menu; please follow the on screen