


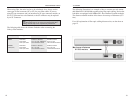

10/100 Hubs
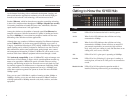
Each EtherFast II 10/100 Hub has a crossover button (labeled MDI/MDIX)
on the front of the hub that allows you to connect with other hubs, switches,
or routers. To activate the uplinking capability, make sure that the
MDI/MDIX button is not depressed. Insert one end of a straight-through RJ-
45 cable into port #1 and the other end into the desired device. The 10/100
Hub will automatically determine the optimum speed of the device being
attached to it.
To power on the hub, plug the supplied AC electrical power cord into the
back of the hub. The hub will put itself through a series of diagnostic tests --
which shouldn’t take more than just a few seconds -- then begin scanning the
ports for live nodes. The installation is complete.
To reset the hub, unplug the unit for at least three seconds then plug it back
in. The hub is reset.
7
Instant EtherFast II Series
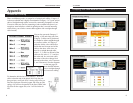
Each 10/100 16 and 24-Port rack mountable hub comes with a fiber optic
expansion slot which accepts an optional 100BaseFX fiber optic module for
connecting to high-speed fiber cabling. If you purchased an optional fiber
optic expansion module, set it up by following the setup instructions included
in the Appendix of this guide, (page 11).
Each hub is equipped with mounting hardware that can be used to secure it in
a stationary or movable 19” rack. To mount the brackets to the hub, line up
the holes on the bracket with the holes on the side of the hub (make sure that
the flange on the bracket is to the rear), then fasten the bracket to the hub
using the screws provided.
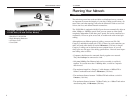
The 10/100 Hub can be connected to either 10Mbps or 100Mbps PCs, work-
stations, file servers, print servers, or other hardware. When powered up,
each of the hub’s 10/100 ports will automatically adjust to the proper speed,
as determined by the speed of the hardware or node connected to the port.
Connect each of your PCs, workstations, file servers, print servers, or other
network nodes to the 10/100 Hub one by one. Each node should be
connected to the hub with a straight-through, Category 5 cable with RJ-45
connectors. Each cable should be less than 100 meters (328 feet), in length.
Ready-to-use network cables of various lengths can be purchased at most
computer stores. If you wish to crimp your own cabling for custom sites or
lengths, see page 9 for cabling specifications.
When connecting a PC to a hub, either the computer or the hub must be pow-
ered OFF. If both the computer and the hub are turned on while the connec-
tion is completed, the network will act erratically and you must reset the hub
(see page 7).
6
Optional Fiber Expansion Module
Mounting the Hub
NNoottee::
Screws required for installing the hub in your
rack are not included with the mounting hardware.
Connecting Nodes to the 10/100 Hub
Uplinking the Hub
NNoottee::
When the
MMDDII//MMDDIIXX
button is
depressed, the port will function normally.
Powering on the Hub
Resetting the Hub