


9
Contents
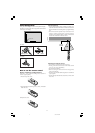
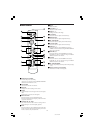
Contents of the Package
Ⅺ Plasma monitor
Ⅺ Power cord
Ⅺ Remote control with two AAA Batteries
Ⅺ User Guide
Ⅺ Safety metal fittings
Ⅺ Ferrite cores, bands
Ⅺ Cable clamps
* These are fittings for fastening the unit to a wall to prevent
tipping due to external shock when using the stand
(optional). Fasten the safety fittings to the holes in the
back of the monitor using the safety fitting mount screws
(see page 10).
Options
• Wall mount unit
• Ceiling mount unit
• Tilt mount unit
• Stand
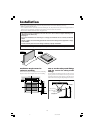
Installation .................................................... 10
Ventilation Requirements for enclosure mounting ........ 10
How to use the safety metal fittings and the screws
for safety metal fittings ......................................... 10
Cable Management................................................ 11
How to use the remote control.................................. 11
Battery Installation and Replacement ......................... 11
Operating Range ........................................................ 11
Handling the remote control....................................... 11
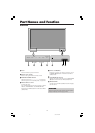
Part Names and Function ................................ 12
Front View ............................................................ 12
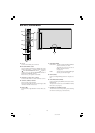
Rear View/ Terminal Board ..................................... 13
Remote Control ...................................................... 14
Basic Operations............................................. 15
POWER ................................................................ 15
To turn the unit ON and OFF: .................................... 15
VOLUME .............................................................. 15
To adjust the sound volume:....................................... 15
MUTE ................................................................... 15
To mute the audio: ..................................................... 15
DISPLAY ................................................................ 15
To check the settings: ................................................. 15
DIGITAL ZOOM ..................................................... 15
OFF TIMER ............................................................ 15
To set the off timer: .................................................... 15
To check the remaining time: ..................................... 15
To cancel the off timer: .............................................. 15
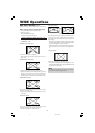
WIDE Operations............................................. 16
Wide Screen Operation (manual) ............................ 16
When viewing videos or digital video discs ............... 16
Wide Screen Operation with Computer Signals ......... 17
OSM (On Screen Menu) Controls ....................... 18
Menu Operations ................................................... 18
Menu Tree ............................................................. 19
Picture Settings Menu.............................................. 21
Storing picture settings............................................... 21
Adjusting the picture .................................................. 21
Reducing noise in the picture ..................................... 21
Setting the color temperature ..................................... 22
Adjusting the color to the desired level ...................... 22
Changing the Gamma Curve ...................................... 22
Making the Low Tone adjustments ............................ 22
Adjusting the pedestal level (black level) ................... 23
Adjusting the colors ................................................... 23
Setting the picture to suit the movie ........................... 23
Setting the picture mode according
to the brightness of the room ................................... 23
Audio Settings Menu .............................................. 24
Adjusting the treble, bass and left/right balance
and audio input select .............................................. 24
Setting the allocation of the audio connectors ............ 24
Image Adjust Settings Menu .................................... 24
Adjusting the Position, Size, Fine Picture, Picture ADJ. ...
24
SET UP Settings Menu ............................................. 25
Setting the language for the menus............................. 25
Setting the BNC connectors ....................................... 25
Checking the signal being transmitted to
RGB1 terminal ........................................................ 25
Setting high definition images to the suitable
screen size ............................................................... 25
Setting a computer image to the correct RGB select
screen ...................................................................... 25
Setting the signal and black level for HDMI signal .... 26
Setting the video signal format ................................... 26
Setting the background color when no signal is
being input .............................................................. 26
Setting the gray level for the sides of the screen ......... 27
Setting the screen size for S1/S2 video input .............. 27
Turning on/off the menu display ................................ 27
Setting the position of the menu ................................. 27
Resetting to the default values.................................... 27
Function Settings Menu ........................................... 28
Setting the power management for computer images ...
28
POWER/STANDBY indicator ................................... 28
Setting the Input Skip................................................. 28
Reducing burn-in of the screen .................................. 28
Setting Closed Caption .............................................. 30
Reducing the brightness of Closed Caption ................ 30
Signal Information Menu......................................... 30
Checking the frequencies, polarities of input signals,
and resolution .......................................................... 30
External Control ............................................. 31
Application ........................................................... 31
Connections .......................................................... 31
Type of connector: D-Sub 9-pin male ........................ 31
Communication Parameters ..................................... 31
External Control Codes (Reference) .......................... 31
Pin Assignments ............................................. 31
mini D-Sub 15-pin connector (Analog) ..................... 31
HDMI connector (Digital)......................................... 31
Troubleshooting.............................................. 32
Specifications : PD4230V ................................. 33
Specifications : PD4250D ................................. 34
Specifications : PD5050D ................................. 35
Specifications : PD6150D ................................. 36
Table of Signals Supported .............................. 37
Ⅵ PD4230V Supported resolution............................ 37
Computer input signals supported by this system ....... 37
Table of Signals Supported .............................. 38
Ⅵ PD4250D Supported resolution ........................... 38
Computer input signals supported by this system ....... 38
Table of Signals Supported .............................. 39
Ⅵ PD5050D/PD6150D Supported resolution ............ 39
Computer input signals supported by this system ....... 39
04.9.2, 11:42 AM9