INSTALLATION
4 – 4
Before You BeginBefore You Begin
Before You BeginBefore You Begin
Before You Begin
Important – Please ReadImportant – Please Read
Important – Please ReadImportant – Please Read
Important – Please Read
Please read this installation section completely before installing the Maxtor hard drive. It gives general
information for installing a Maxtor hard drive in a typical computer system. If you don’t understand the
installation steps, have a qualified computer technician install the hard drive.
Back up. Protect your Existing DataBack up. Protect your Existing Data
Back up. Protect your Existing DataBack up. Protect your Existing Data
Back up. Protect your Existing Data
Periodic backup of important data is always a good idea. Whenever your computer is on, there is the
potential for losing data on your hard drive. This is especially true when running disk utilities or any software
that directly manipulates your files. Maxtor recommends that you make a backup copy of the files on any
existing hard drives prior to installing the new drive. If required, this data may then be copied to the Maxtor
hard drive after it has been installed in the computer. Refer to your computer user’s manual for detailed data
backup instructions.
Tools for InstallationTools for Installation
Tools for InstallationTools for Installation
Tools for Installation
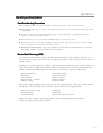
The following tools are needed to install your new Maxtor hard drive:
• A small (#2) Phillips head screw driver
• Small needle-nose pliers or tweezers
• Your computer user’s manuals
• Operating system software
System RequirementsSystem Requirements
System RequirementsSystem Requirements
System Requirements
• IDE/AT interface
Maxtor recommends:
• Drives less than or equal to 8.4 GB – 486 DX 66 MHz
• Drives larger than 8.4 GB – Pentium-class processor
Operating System RequirementsOperating System Requirements
Operating System RequirementsOperating System Requirements
Operating System Requirements
• Drives less than or equal to 8.4 GB:
- DOS 5.0 or higher
• Drives larger than 8.4 GB:
- Installing as boot drive (Primary Master) requires full installation set of Windows 95/98 – not an update
from DOS or Windows 3.x.
- Installing as non-boot drive (Primary Slave, Secondary Master or Slave) requires Windows 95/98 on the
boot drive.
Hook upHook up
Hook upHook up
Hook up
Maxtor recommends that you use the MaxBlast™ Plus software to create a customized installation guide for your
system before physically installing your new hard drive. The information created by MaxBlast Plus relates to the
following illustrations.
Boot the System with the MaxBlast Plus DisketteBoot the System with the MaxBlast Plus Diskette
Boot the System with the MaxBlast Plus DisketteBoot the System with the MaxBlast Plus Diskette
Boot the System with the MaxBlast Plus Diskette
Before physically installing the Maxtor hard drive, boot your system with the MaxBlast Plus diskette. It will
assist you with the instructions in this section for a successful installation.
Configure the Drive JumpersConfigure the Drive Jumpers
Configure the Drive JumpersConfigure the Drive Jumpers
Configure the Drive Jumpers
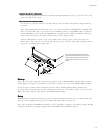
The jumper configurations have three valid jumper settings – Master, Slave and Cable Select. Maxtor hard
drives are always shipped with the Master jumper setting enabled.
Install the 5.25-inch Mounting BracketsInstall the 5.25-inch Mounting Brackets
Install the 5.25-inch Mounting BracketsInstall the 5.25-inch Mounting Brackets
Install the 5.25-inch Mounting Brackets
If the Maxtor hard drive will be mounted in a 5.25-inch device bay, you will need to attach 5.25-inch
brackets to the hard drive. These brackets are not required if the drive is mounted in a 3.5-inch device bay.


