


Microboards Technology PF-2 PrintFactory
7
3) Press the Power button to turn on the printer.
4) Open the top cover. The print cartridge cradle moves to the center of the printer.
5) Raise the cradle latch.
6) If replacing an ink cartridge, lift the old cartridge out of the cradle.
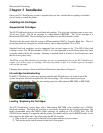
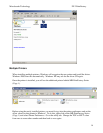
7) Remove the new print cartridge from its packaging and carefully remove the plastic tape.
Hold the print cartridge so that the copper strip is at the bottom.
Pull tab to remove the plastic tape.
Black Cartridge
Color Cartridge
8) Push the print cartridge firmly into the cradle.
9) Secure the cradle latch.
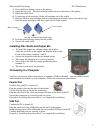
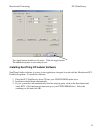
Installing Disc Guide and Output Bin
• To install the output bin, slide the output bin in place.
Align the two holes in the output bin with the holes on the
Front of the printer (numbers 1 and 2).
• Secure the output bin with the two thumb screws.
• The output bin should now be securely in place.
• Next, slide in the 100 disc output spindle into place
(number 3).
• The unit is now ready for operation.
Connecting to a Computer
You have two options when connecting to a computer, USB and Parallel. You will need to decide
which method is available on your computer. Follow the instructions listed below.
3
1
2
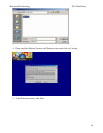
Parallel Port
Confirm that your PC is turned off.
Plug the printer cable into the back of the printer.
Use the locking clips to secure the connection.
Plug the other end of the cable into the parallel port on the back of the PC.
Secure the connection by screwing in the two posts.
Proceed to “Installing the printer driver” to complete the installation.
USB Port
Confirm the PC is turned off.
Plug the small end of the USB cable into the back of the printer.
Install the larger end of the USB cable into an available USB port on the PC.
Confirm that both ends are securely in place.
Proceed to “Installing the printer driver” to complete the installation.