


MICROBOARDS TECHNOLOGY, LLC PF-PRO Disc Printer
7
Installing Ink Cartridges and Print Heads
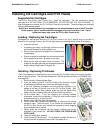
Supported Ink Cartridges
The PF-Pro Disc Printer uses 3 color and 1 black ink cartridges. The part numbers for these
cartridges are PFP-HC-CYAN, PFP-HC-MAGENTA, PFP-HC-YELLOW, and PFP-HC-BLACK. If
other cartridges are installed, the PF-Pro Disc Printer will not function. These cartridges are available
from any Microboards reseller.
Refill kits or non-Microboards ink cartridges are not recommended for use in the PF-Pro Disc
Printer system. Use of non-Microboards cartridges will cause the printer to fail. Use of
refilled cartridges may cause the PF-Pro Disc Printer to fail.
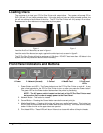
Loading / Replacing Ink Cartridges
Cartridges can be changed while the PF-Pro Disc Printer is on, but it should never be turned on
without an ink cartridge in place. An LED will light above any cartridge that is below 25% capacity.
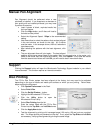
• Lower the ink door.
• If replacing an empty ink cartridge, remove the color
that needs changing by pulling straight out.
• Remove each new print cartridge to be installed from
its packaging.
• Slide the correct ink cartridge into the correct slot with
the arrows pointing down, as shown to the right.
• Raise the ink door and latch it back into place. The
printer will be ready after the ink cartridges pressurize
and the Media Feed button LED goes out.
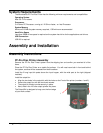
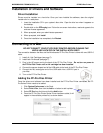
Installing / Replacing Printheads
The 2 Printheads are not installed when you receive the PF-Pro Disc Printer, and must be installed
prior to using the printer. The printhead models are CG316A (yellow and black) and C9382A (cyan
and magenta).
1. Raise the top Printhead Access Door.
2. If you are setting up the PF-Pro Disc Printer for the first time, remove
any packaging materials from around the printhead carriage.
3. If you are replacing printheads and the printhead carriage is not
parked all the way to the left, turn on the PF-Pro Disc Printer. With
the Printhead Access Door opened, press and hold the Media Feed
button until the carriage moves to the left and locks into position.
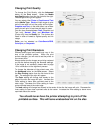
4. Lift the cradle latch. If you are replacing the currently installed
printheads, remove the printheads by lifting the blue handle of each
and gently pulling up on each handle.
5. Remove the printheads from the packaging.
6. Gently shake each printhead 6 times prior to removing the orange
protective caps. Save the caps! If you remove the printheads from
the PF-Pro Disc Printer, they should be recapped to avoid clogging
the printheads and ink valves.
7. Gently press the printheads into the cradle, installing the correct
printhead in the correct slot. DO NOT FORCE THE PRINTHEADS
INTO PLACE.
8. Lower the cradle latch carefully.
9. Lower the top Printhead door. The printhead carriage will return to
the right and will be primed by the printer if the power is on.
Ste
p
4
Ste
p
7