


MICROBOARDS TECHNOLOGY, LLC PF-PRO Disc Printer
9
Installation of Drivers and Software
Driver Installation
Drivers must be installed on a hard disc. Once you have installed the software, store the original
installer disc in a safe place.
1. Insert the Installation CD in your system’s disc drive. Open the disc icon when it appears on
the desktop.
2. Double-click on the PFPro.pkg icon. Follow the on-screen instructions, read and agree to the
end user license agreement.
3. When prompted, enter your administrator password.
4. When prompted, click Install.
5. Once the installation has completed, click Restart.
Connecting to a Mac
DO NOT CONNECT YOUR PF-PRO DISC PRINTER BEFORE RUNNING THE
INSTALLER LOCATED ON THE INSTALLATION DISC!!
The connection between the Mac and the Microboards PF-Pro Disc Printer is done with one USB 2.0
cable.
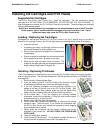
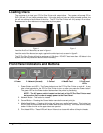
1. Install all 4 Ink Cartridges (see page 7).
2. Install both Printheads (see page 7).
3. Plug in the AC power cord to the back of the PF-Pro Disc Printer. Do not turn on power to
the PF-Pro Disc Printer until an ink cartridge has been installed.
4. Connect the square shaped end of the USB cable to the back of the PF-Pro Disc Printer.
5. Connect the flat, rectangular end of the USB cable into a USB 2.0 port in
your Mac.
6. Turn on the PF-Pro Disc Printer.
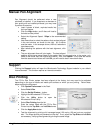
Adding the PF-Pro Disc Printer
Once the drivers and software have been installed and the PF-Pro Disc Printer connected, the PF-
Pro Series Printer needs to be added.
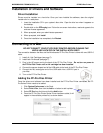
1. Click System Preferences in the Dock.
2. Select Print & Fax, then click the Add or + button to add a printer.
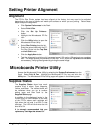
3. Select PF-Pro from the list and click the Add button.
4. Once the PF-Pro Disc Printer Series Printer has been added, it will
appear in the available printers list, as shown below.