


Wireless Gateway User Guide
76
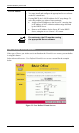
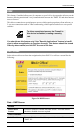
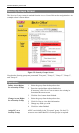
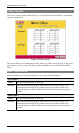
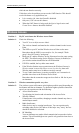
Security Groups Screen
The Security Groups screen is reached from the Access Control link on the navigation bar. An
example screen is shown below.
Figure 35: Security Groups Screen
Note that the Security groups are pre-named "Everyone", "Group 1", "Group 2", "Group 3",
and "Group 4".
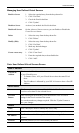
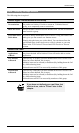
Operations
Define Access Rights
for a Security Group
1.
Select the group from the drop-down box.
2.
Enter the required data as described below.
If necessary, click Clear Form to remove the existing in-
formation shown on screen.
3.
Click the Save button when finished.
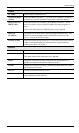
Change Access Rights
for a Security Group
1.
Select the group from the drop-down box,
2.
Click Get Data to view their information
3.
Change any fields you wish.
4.
Click Save when finished.
Assign PCs to a
Security Group
All PCs are initially in the "Everyone" group. Use the PCs
screen to move individual PCs to other groups as required.