


MN 325/MN 525 User’s Manual
Uninterruptible Power Supply (UPS)
3
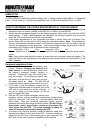
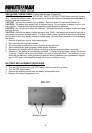
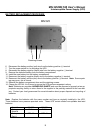
5. Plug the UPS into a 2 pole, 3 wire grounding receptacle (AC wall outlet). Make sure the wall
branch outlet is protected by a fuse or circuit breaker and does not service equipment with large
electrical demands (e.g. refrigerator, copier, etc…). Note: DO NOT use extension cords, power
or surge strips on the input or the output of the UPS.
6. Depress the power switch to turn the UPS on. The power on indicator light will illuminate and the
UPS will “beep” once.
7. If an overload is detected, an audible alarm will sound and the UPS will emit one long beep. To
correct this, turn the UPS off and unplug at least one piece of equipment from the battery-
powered outlets. Wait 10-seconds. Make sure the circuit breaker is depressed and then turn the
UPS on.
8. Your UPS is equipped with an auto-charge feature (MN 525 only). When the UPS is plugged into
an AC wall outlet, the battery will automatically recharge.
9. To maintain optimal battery charge, leave the UPS plugged into an AC wall outlet with the power
switch turned on at all times.
10. To store your UPS for an extended period, cover and store it with the battery fully charged. Re-
charge the battery every three months to ensure battery life.
MINUTEMAN POWERCENTER SOFTWARE INSTALLATION GUIDE
Note: Use of the software is optional. The UPS will provide surge protection and battery backup
without the software. You must use the software if you wish to have the automatic shutdown feature.
FOR WINDOWS 95/98/Me
1. Turn the UPS off and unplug it.
2. Connect the serial interface cable to the UPS and an open serial port on the back of the com-
puter. Note: You must use the serial cable that was provided with the UPS.
3. Plug the UPS into an AC wall outlet, turn the UPS on and then start your computer.
4. Click on Start, point to Settings, and then click Control Panel.
5. Double-click Add/Remove Programs.
6. Insert the software disk into the floppy drive.
7. Click Install.
8. Follow the on-screen instructions.
9. Once the software is installed, remove the floppy disk and restart your computer.
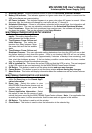
When your computer restarts, the MINUTE-
MAN PowerCenter software will appear on
your screen for a few seconds, and then mini-
mize. It will appear as a blue and white battery
icon located in the system tray, near the clock.
FOR WINDOWS NT
1. Click on Start, point to Settings, and then click Control Panel.
2. Double-click the UPS Icon.
3. Remove the check mark from the box labeled UPS is installed on.
4. Click OK.
5. Acknowledge the message that the UPS is in an unknown state.
6. Exit to the desktop.
7. Shutdown your computer.
8. Turn the UPS off and unplug it.
9. Connect the serial interface cable to the UPS and an open serial port on the back of your com-
puter. Note: You must use the cable that was provided with the UPS.
10. Plug the UPS into an AC wall outlet, turn the UPS on and then start your computer.
11. Click on Start, point to Settings, and then click Control Panel.
12. Double-click Add/Remove Programs.
13. Insert the software disk into the floppy drive.
14. Click Install.
15. Follow the on-screen instructions.
16. Once the software is installed, remove the floppy disk and restart your computer.
Software Icon