


Chapter 2 Configuring and Installing the SCXI Chassis
SCXI Chassis User Manual 2-16 ni.com
Installing the SCXI Chassis
These sections provide information about installing the SCXI chassis.
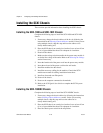
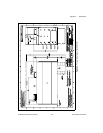
Installing the SCXI-1000 and SCXI-1001 Chassis
Complete the following steps to install the SCXI-1000 and SCXI-1001
chassis:
1. If necessary, change the chassis address of the box by following the
instructions in the Selecting Chassis Addresses section. Unless you are
using multiple chassis, skip this step and leave the address at its
factory-default setting of 0.
2. Place the SCXI chassis on a sturdy, level surface. Leave at least 10 cm
(4 in.) of space behind the chassis for adequate air circulation.
3. Power off the chassis.
4. Make sure the voltage selection tumbler in the power entry module is
set for the line voltage of the outlet. Refer to the Selecting the Voltage
section if necessary.
5. Insert the female end of the power cord into the power entry module.
6. Insert the male end of the power cord into the wall outlet.
7. Install the modules into the chassis.
8. Install the necessary cabling for the modules. Consult the SCXI
module user manual for cabling installation instructions.
9. Install any front and rear filler panels.
10. Power on the chassis.
11. Power on the computer connected to the modules.
12. Refer to the SCXI Quick Start Guide to complete the SCXI system
installation.
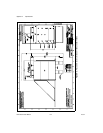
Installing the SCXI-1000DC Chassis
Complete the following steps to install the SCXI-1000DC chassis:
1. If necessary, change the chassis address by following the instructions
in the Selecting Chassis Addresses section. Unless you are using
multiple chassis, skip this step and leave the address at its
factory-default setting of 0.
2. Place the SCXI chassis on a sturdy, level surface. Leave at least 10 cm
(4 in.) of space behind the chassis for adequate air circulation.
3. Place the chassis power switch in the off position.