


4-12 Upgrading Your System
7. Remove the new processor from its antistatic package and place it on a
grounded, static-free surface or conductive foam pad.
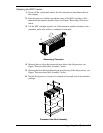
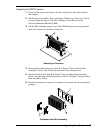
8. Position the heat sink, Item C in Figure "Processor Heat Sink Assembly"
above, on the front of the new processor so that the holes in the heat sink
line up with the holes in the processor.
9. Install the attachment clip, Item A in Figure "Processor Heat Sink
Assembly" above, that secures the heat sink to the processor.
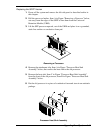
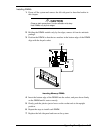
10. Position the processor back into the URM. Ensure that the alignment notch
in the SEPP board fits over the plug in Slot 1. Push down firmly, with even
pressure on both sides of the top, until the SEPP board is seated.
11. To lock in the processor, push the latches inward until they secure the SEPP
board into place in the URM, Item A in Figure "Removing a Processor"
above. The latches must be secured for proper electrical connection of the
processor.
12. After you have installed a new processor, you must run the BIOS Setup
Utility (F2) to configure its speed. Refer to Chapter 3, “Configuring Your
System.”
13. Replace the left side panel and power up the system.