


English-2
English
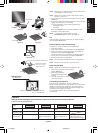
Headphone
Figure C.1
Power Button
Figure TS.1
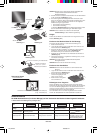
Figure R.1
Non-abrasive surface
Figure R.2
Figure R.3
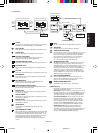
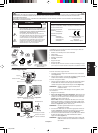
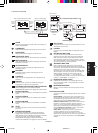
4-SCREWS (M4)
(MAX depth: 8.5 mm)
Weight of LCD assembly: 3.9 kg - LCD73VM (MAX)
5.2 kg - LCD93VM (MAX)
Specifications
Tighten all screws
100 mm
Thickness of Bracket
(Arm) 2.0 ~ 3.2 mm
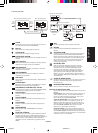
Controls
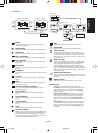
OSM (On-Screen Manager) control buttons on the front of the monitor function as follows:
1. Basic function at pressing each key
Showing OSM. Shortcut to Bright adjust
window.
Button
At No OSD
showing
Shortcut to Volume adjust
window.
At OSD showing
(Icon selection stage)
Go to Adjustment stage. Cursor goes to left. Cursor goes to right.
At OSD showing
(Adjustment stage)
Go to Icon selection stage. Adjust value decrease or
Cursor for adjust goes to
left.
Adjust value increase or
Cursor for adjust goes to
right.
SELECT
– +
“Auto adjust” operate.
Reset operation.
Mute off/on switch on
Volume adjustment window.
AUTO/RESET
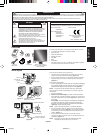
NOTE: Adjust position of cable that place under the Cable holder to
avoid damage for cable or monitor.
NOTE: Please refer to Caution section of this manual for proper
selection of power cord.
5. Turn on the monitor with the front power button and the computer
(Figure C.1).
6. No-touch Auto Adjust automatically adjusts the monitor to optimal
settings upon initial setup for most timings.
For further adjustments, use the following OSM controls:
• Auto Adjust Contrast
• Auto Adjust
Refer to the Controls section of this User’s Manual for a full
description of these OSM controls.
NOTE: If you have any problem, please refer to the
Troubleshooting section of this User’s Manual.
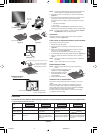
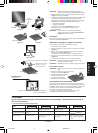
Tilt
Grasp both sides of the monitor screen with your hands and adjust
the tilt as desired (Figure TS.1).
Remove Monitor Stand for Mounting
To prepare the monitor for alternative mounting purposes:
1. Disconnect all cables.
2. Place monitor face down on a non-abrasive surface (Figure R.1).
3. Remove the 2 screws connecting the monitor to the stand and
remove the stand as indicated (Figure R.2).
The monitor is now ready for mounting in an alternative manner.
4. Connect the AC cord to the back of the monitor (Figure R.3).
5. Reverse this process to re-attach stand.
NOTE: Use only VESA-compatible alternative mounting method.
NOTE: Handle with care when removing monitor stand.
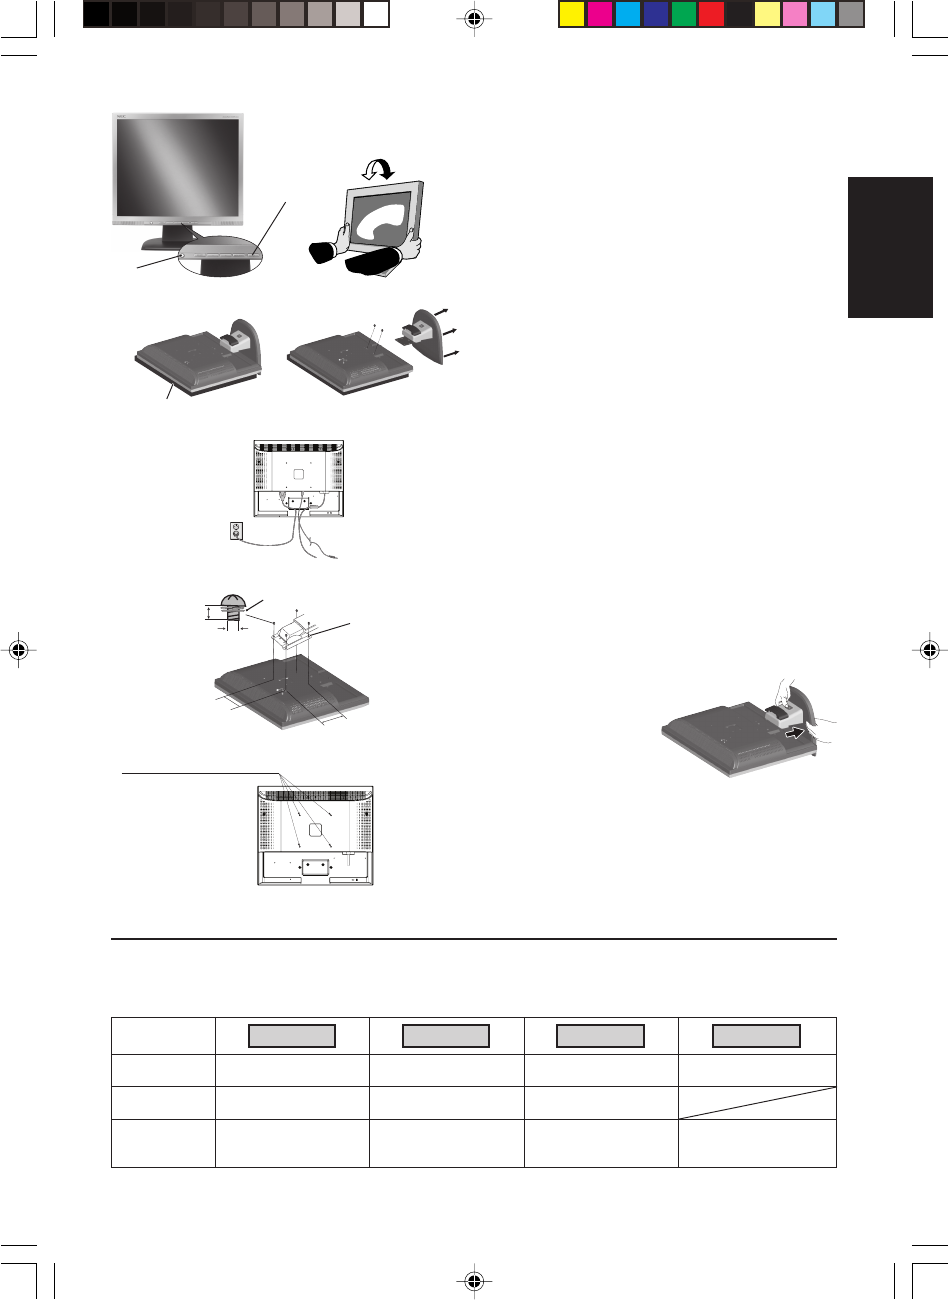
Removing the Base
NOTE: Always remove the Base when shipping the LCD.
1. Place monitor face down on a non-abrasive
surface (Figure R.1).
2. While using your thumbs,
press the bottom tabs upward
to unlock.
3. Press the top tabs down to unlock
and pull off the stand.
Connecting a Flexible Arm
This LCD monitor is designed for use with a flexible arm.
Please use the attached screws (4pcs) as shown in the picture when
installing. To meet the safety requirements, the monitor must be
mounted to an arm which guaranties the necessary stability under
consideration of the weight of the monitor.
The LCD monitor shall only be used with an approved arm
(e.g. GS mark).
100 mm
4 x 12 mm with lock washer and flat washer
01_English 16/5/06, 9:112