


E–12
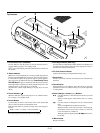
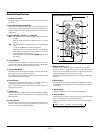
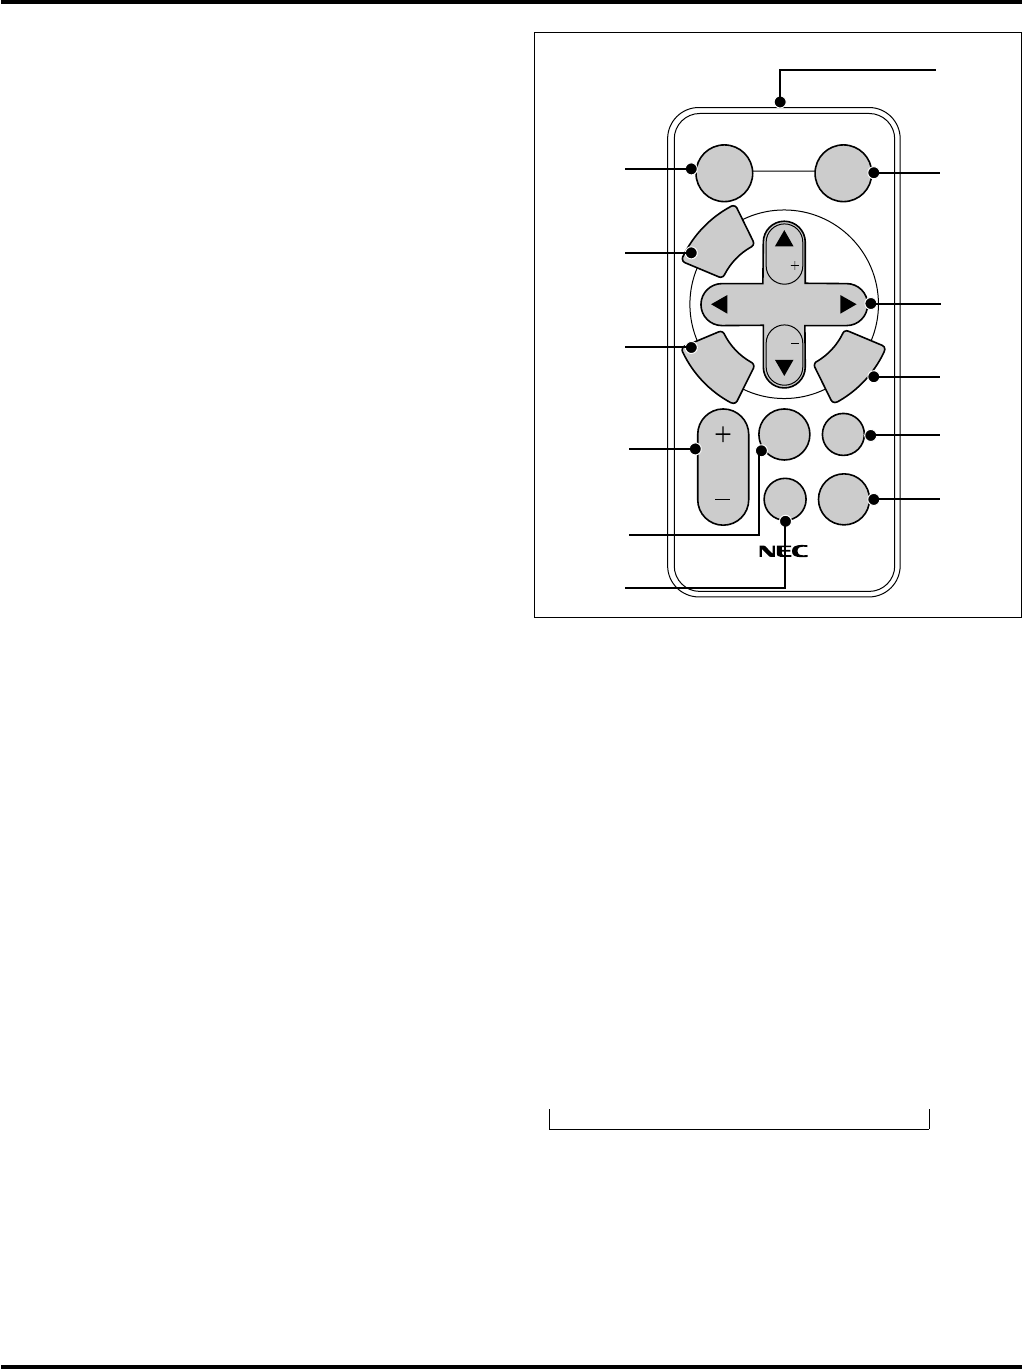
Remote Control Features
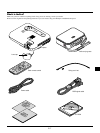
1. Infrared Transmitter
Direct the remote control toward the remote sensor on the projec-
tor cabinet.
2. Auto Adjust Button (RGB only)
Press this to automatically adjust the vertical/horizontal position,
clock frequency/phase and resolution if the projected picture is not
centered, if there are vertical stripes on the picture or if the picture
is flickering.
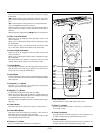
3. Select (▲▼
ᮤ ᮣ) / Volume (+) (–) Buttons
▲▼: Use these buttons to select the menu of the item you wish
to adjust.
When no menus appear, these buttons work as a volume
control.
ᮤ ᮣ: Use these buttons to change the level of a selected menu
item.
A press of the ᮣ button executes the selection.
When the menus or the Viewer tool bar is not displayed,
these buttons can be used to select a slide, or to move the
cursor in Folder List or Slide List.
When the pointer is displayed, these ▲▼ᮤ ᮣ buttons move
the pointer.
4. Cancel Button
Press this button to exit "Menus". Press this button to return to the
previous menu without storing the current settings or adjustments
when you are in the submenu or adjustment screen.
5. Picture Mute Button
This button turns off an image and sound for a short period of time.
Press again to restore the image and sound.
NOTE: When the menu is displayed, a press of this button mutes an image
and sound without turning off the menu.
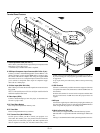
6. Power Button
If the power is applied and the projector is in standby mode, you
can use this button to turn your projector on and off.
NOTE: To turn off the projector, press and hold the POWER button for a
minimum of two seconds.
7. Help Button
Provides information about operation and adjustment procedures
or the set information for the current menu or adjustment during
menu operation.
8. Pointer Button
Press this button to display one of the eight pointers; press again to
hide the pointer. You can move your pointer icon to the area you
want on the screen using the Select button.
9. Magnify Button (+) (–)
Use the (+) or (–) button to adjust the image size up to 400%.
When the pointer is displayed, the image is magnified about the
pointer as its center. When the pointer is not displayed, the image
is magnified about the screen center as its center.
When the image is magnified, the pointer is changed to the magni-
fying icon.
10. Enter Button
Press this button to execute the selected item. When this is pressed,
the adjustments and settings are saved, and the display is returned
to the menu.
11. Menu Button
Displays the menu for various settings and adjustments.
12. Source Button
Press this button to select a video source such as a PC, VCR, DVD
player or PC Card Viewer (CompactFlash card).
Each time this button is pressed, the input source will change as
follows:
→ RGB → Video → S-Video → PC Card Viewer
If no input signal is present, the input will be skipped.
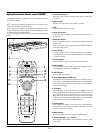
Supplied Remote Control
SELECT
Vol.
Vol.
POINTER
POWER
HELP
RD-366E
PIC.
MUTE
MAGNIFY
SOURCE
AUTO
ADJ.
M
E
N
U
E
N
T
E
R
C
A
N
C
E
L
1
2
3
4
5
7
8
9
10
11
12
6