


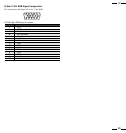
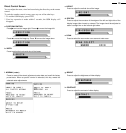


Mode
On
Standby
Standby
Suspend
Off
Power Off
Pin No. 4 (Intelligent Power Manager)
This function saves power.
When Intelligent Power Manager (IPM™) control is on, by using the
monitor’ s horizontal and vertical SYNC signals, the monitor can be
prompted into the different IPM modes. The following is the description of
the LED indicator for the IPM power saving modes:
LED Indicator
Green
Red (Steady)
Amber(Blinking quickly)
Amber(Blinking moderately)
Amber(Blinking slowly)
No Light
Power Saving
None
None
Minimum
(Quickest recovery)
Moderate
(EPA<8 watts, Moderate recovery)
Maximum
(EPA<8 watts, Slowest recovery)
No Power Used (Fully Off)
NOTE: The Intelligent Power Manager works only for the RGB input. If selecting
the VIDEO input, or when connecting to no signal source, the Intelligent Power
Manager does not work.
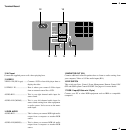
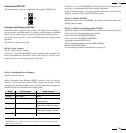
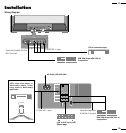
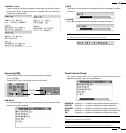
Functions of DIP SW
The drawing below shows the original factory settings of DIP Switch.
Functions and Settings of DIP SW
This DIP switch is used for Sync. Control, Intelligent Power Manager,
wireless control, and OSM control. To change a switch setting use a pointed
object, such as a pen or pencil, to push the switch to the desired position.
Set all the pin except No. 2 to the OFF/OPEN position during normal
operation.
The pins nos 5 and 6 are not used.
Pin No 1 (Sync. Control)
The No. 1 pin sets Sync. Control.
Set the No. 1 pin to the OFF/OPEN position during normal operation. The
monitor automatically determines if the input signal is separate sync,
composite sync or sync on green signal in this order.
Set the No. 1 pin to the ON/SHORT position when sync on green signals are
necessary for synchronization with an external component.
When a composite signal is present, the picture may be distorted. If this
happens, set the No.2 pin to the OFF/OPEN position.
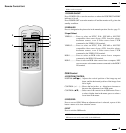
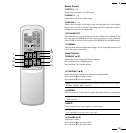
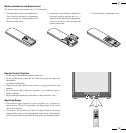
Pin No. 2 (Remote ON/OFF)
When this switch is set to ON/SHORT, the monitor can be controlled by the
wireless remote control.
Pin No. 3 (OSM System Control Menu ON/OFF)
When this switch is set to ON/SHORT, the system control menu is displayed.
In this menu the following features are enabled:
Power on mode set(POWER ON MODE)
Front control key on/off(KEY CONTROL)
Language selection(LANGUAGE)
Video mode(auto/manual) selection(VIDEO MODE)
OSM on/off(OSM ON/OFF)
For the setting procedures to set the items, see page 39.
ON
1
2
3
4 56
ONOFF
13
14