


NTI RACKMUX-V15/17 RACKMOUNT LCD MONITOR WITH KEYBOARD AND MOUSE
6
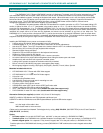
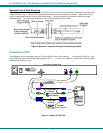
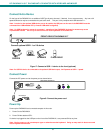
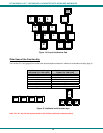
Connect Extra Device
On the front of the RACKMUX is an additional USB Type A port to be used, if desired, for an extra accessory. Any low or full
speed USB device may be connected to this port to be used. This port is fully compliant with USB standard 1.1.
Note: In order for the optional USB device port to be usable, the USB port on the rear of the RACKMUX must be
connected to a USB enabled CPU (a 2 meter USB cable is supplied).
Note: If a USB keyboard or mouse is connected, operation of the RACKMUX keyboard or mouse may cause
unpredictable results. Do not try to use both mice or both keyboards at the same time.
Figure 7- Connect a USB 1.1 device to the front (optional)
Note: If a USB 2.0 device is connected to the optional USB device port, it will operate at USB 1.1 speed.
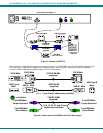
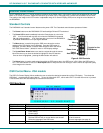
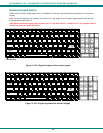
Connect Power
Connect the IEC power cord to the power port as shown below.
Figure 8- Connect the power cord
Power Up
Power up the RACKMUX and connected computer in this order.
1. Power On the RACKMUX
2. Power ON the attached CPU.
If a device is plugged into the USB port on the front of the RACKMUX, it can powered-ON at any time.
Note: During power-up, do not attempt to type or otherwise use the keyboard. Doing so may result in boot errors and
loss of keyboard and mouse.
REAR VIEW OF RACKMUX-V17
IEC Powercord
NTI
NETWORK
TECHNOLOGIES
INCORPORATED
Tel:330-562-7070
Fax:330-562-1999
1275 Danner Dr
Aurora, OH 44202
www.networktechinc.com
CAMERA
PRINTER
SCANNER
Connect optional USB 1.1 or 2.0 device
FLASH DRIVE
FRONT VIEW OF RACKMUX-V17