


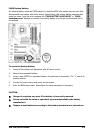


Hardware Setup
IN9 32X/IN9 32X-MAX 1-9
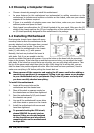
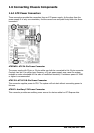
1.6.4 Additional Cooling Fan for NB Heatsink
To attach an additional chipset cooling fan for model
“IN9 32X-MAX”
:
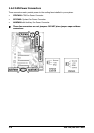
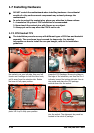
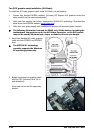
Inside the motherboard package you can find a pair of retention clips. These retention clips are
used to fasten an additional cooling-fan attached onto the north bridge heatsink to blow away
the heatwave radiated from the heatsink.
As shown in the photo, you will have to buy
an additional three-wire cooling fan in
40x40x10mm size: (You may have to
consider the wire length according to which
fan power connector you want to connect
to.)
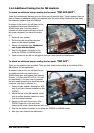
1. Power off your system.
2. Put the fan with its airflow direction
down on the chipset heatsink.
3. Secure the retention clips.
Make sure
not to jam the fan blades.
4. Plug the fan power connector to the
three-pin SYSFAN or AUXFAN header.
5. Check to see the fan will not be jiggled. Now you have finished the attachment.
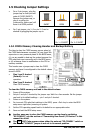
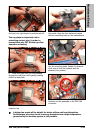
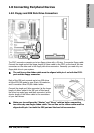
To attach an additional chipset cooling fan for model
“IN9 32X”
:
There are no retention clips provided. There are two screw-holes located at the bottom of the
NB heatsink for fan attachment.
As shown in the photo, you will have to buy
an additional three-wire cooling fan in
40x40x10mm size, and prepare two Machine
Screws (
Pan Head M3 x P0.5 x 10 mm)
for attachment: (You may have to consider
the wire length according to which fan power
connector you want to connect to.)
1. Power off your system. Remove the VGA
card if you had it already installed on slot
PCIEXP1.
2. Attach the fan to the NB heatsink, either
with its airflow direction toward or away
from the chipset heatsink.
3. Secure the fan with two screws. (Slot
PCIEXP1 might be in the way when
fastening the screw, please proceed with care.)
4. Plug the fan power connector to the three-pin SYSFAN or AUXFAN header.
5. Now you have finished the attachment.