


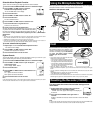

Erase All Files in a Date Subfolder
1 Press the MENU/FOLDER button to select folder S.
2 Press the 9/+ or 0/– button to select the date subfolder to be
erased.
3 Press and hold the ERASE button for 2 seconds or
longer.
“ALL” flashes, then alternatively the date of the selected
subfolder and “YES” appear on the display for 8 seconds.
4 Press the ERASE button again.
All files in the date subfolder are erased.
Note
If you leave the recorder untouched for 8 seconds or longer before you press the ERASE button
in step 4, Erase mode will be canceled, and the recorder will enter Stop mode.
Erase All Files in the S Folder
1
Press the MENU/FOLDER button to select folder S.
2 Press and hold the ERASE button for 4 seconds or
longer.
“S” and “ALL” flash, then alternatively “ERASE” and “YES”
appear on the display for 8 seconds.
3 Press the ERASE button again.
All files in folder S are erased.
Note
If you leave the recorder untouched for 8 seconds or longer before you press the ERASE button
in step 3, Erase mode will be canceled, and the recorder will enter Stop mode.
Recording Modes
You can select from among three recording modes: HQ (High Quality) mode, SP
(Standard Playback) mode and LP (Long Playback) mode.
HQ mode: approximately 22 minutes (Maximum recording times)
SP mode: approximately 33 minutes
LP mode: approximately 90 minutes
* The recording time available may be shorter than specified if a large number of short
recordings are made. (Use the remaining time and recorded time only as references.)
Press the REC MODE button in Stop mode.
Each time you press the REC MODE button, the recording
mode changes as follows:
Note
Choose HQ or SP mode for recording meetings or lectures with crisp clarity.
Microphone Sensitivity
Microphone sensitivity is adjustable to meet your
recording needs.
Using the MICSENS switch, choose between
the NORMAL and LECTURE positions.
NORMAL: Normal-sensitivity Omnidirectional
mode for dictation.
LECTURE: High-sensitivity Unidirectional mode
for meetings or lectures.
Notes
• Be sure to choose HQ or SP recording mode if you set
the MICSENS switch to the LECTURE position to use
the characteristics of the unidirectional microphone to
the fullest.
• Do NOT touch the microphone grill while recording. Doing so may cause noise, and the
performance of the microphone may deteriorate.
• Be sure to keep the front microphone oriented toward the speaker during recording.
• To ensure successful recording, make a test recording to choose appropriate microphone
sensitivity before recording.
Moving Files Between Folders
(MOVE)
You can move a file recorded in folder A or B to the other.
The moved file is added at the end of the order in the destination folder.
1 Choose the file you want to transfer and press the
PLAY button to play it.*
* You can move the file during playback pause as well.
2 Press and hold the MENU/FOLDER button for 1
second or longer while the file is playing.
Playback stops, and “MOVE” flashes on the display. The
file is moved.
The destination folder and the number of the moved file
appear on the display, and moving is completed.
Notes
• You cannot move files between folder S and the other folders.
• If the destination folder is full (100 files), “FULL” appears on the display, and you cannot move
the file to that folder.
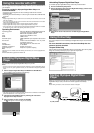
Entering Options Mode
1 Press and hold the MENU/FOLDER button for 1 second or longer in
Stop mode to enter Options mode.
2 Each time you press the 9/+ or 0/– button, the displayed setting
item changes in the following order:
To close the menu, press the STOP button.
Using the Variable Control Voice Actuator (VCVA)
When the microphone senses that sounds have reached a preset volume, the built-
in Variable Control Voice Actuator (VCVA) starts recording automatically, and stops
it when the volume drops.
Particularly helpful for extended recording, the VCVA not only conserves memory
by turning off recording during silent periods, but also makes playback more efficient
and convenient.
1 Press and hold the MENU/FOLDER button for
1 second or longer.
The menu opens, and “VCVA” appears on the display.
2 Press the PLAY button.
3 Press the 9/+ or 0/– button to select between
“On” and “OFF.”
On: The VCVA is activated.
OFF: The VCVA is canceled.
4 Press the STOP button to close the menu.
5 Press the REC button to start recording.
Notes
• When the VCVA senses sound louder than its start/stop actuation
level setting, recording starts automatically. When it senses silence
for 1 second or longer, recording pauses automatically, and the recorder enters Standby mode.
• When recording is in progress, the recording lamp is lit. When the recorder is in Standby
mode, “VCVA” flashes on the display, and the recording lamp flashes.
Alarm Playback Function (ALARM)
The alarm playback function can be set to play a selected file at a preset time.
Up to 20 alarms can be set.
1 Choose the file to be played when the alarm sounds.
2 Press and hold the MENU/FOLDER button for 1 second or longer.
3 Press the 9/+ or 0/– button to select the Alarm
Playback Setup screen.
“ALARM” flashes on the display.
4 Press the PLAY button.
The month indicator flashes.
5 Press the 9/+ or 0/– button to set the month.
6 Press the PLAY button to register your month setting.
Continue to set the date, hour, and minute.
7 Set the minute and press the STOP button.
An alarm will sound at the scheduled time for 5 minutes. Press
any button other than the DISPLAY or REC MODE button while
the alarm is sounding to play back the file you associate with the
alarm. Press the STOP button to stop file alarm playback.
Notes
• The alarm tone stop automatically if no button is pressed within 5 minutes after the alarm
starts. The file is not played back in this case.
• After alarm playback is over, the alarm playback function is canceled automatically.
• You cannot set the alarm playback function for more than 20 files. Also, if no files are recorded
in the selected folder, you cannot set the alarm playback function.
To cancel a set alarm playback
1 Repeat steps 1 to 4 in “Alarm Playback Function.”
The month indicator flashes.
2 Press the 9/+ or 0/– button to select the month of the alarm you
want to cancel.
3 Press the PLAY button to register this month setting for alarm
cancellation.
Continue to select the date, hour and minute of the desired alarm
cancellation.
When you set the minute, “On” flashes on the display.
4 Press the 9/+ or 0/– button to select “OFF.”
A set alarm playback is canceled.
5 Press the STOP button to close the menu.
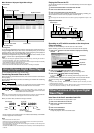
aCurrent recording
mode
(initial setting)
aVCVA indicator
aAlarm indicator