


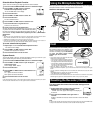

Playing the Files on the PC
Any file transferred from the recorder or recorded directly to the PC can be played
back on the PC.
1 Choose the desired folder in the audio folder window.
2 Click on the desired file on the file list.
3 Click on the PLAY button to play back the file.
You can also perform other operations, such as fast-forwarding, rewinding, etc.,
with the buttons and controls on the playback controller panel.
Note
You cannot play back the files stored on the recorder by Olympus Digital Wave Player on the
PC.
Playback Controller
Recording on a PC with the recorder as the microphone
(Direct recording)
The files are recorder directly on the PC and not on the recorder.
Before recording, make sure the recorder is connected to the PC properly.
1 Click on the
button in the main window to display the recording
window.
2 Click on the
(Record) button to start recording.
The MICSENS switch is adjustable to meet your recording needs.
3 Click on the
(Stop) button to stop recording.
If you press the
button, the recording window changes to the main
window.
The recorded files are stored in the recording folder in the audio folder window.
To pause recording, click on the
(pause) button during recording.
Notes
• To perform direct recording, 20MB or more of the hard-disk space is necessary to assure
stable performance of the PC.
• The recorded files are stored as .wav files. Before recording, make sure that the free memory
of the PC is sufficient for recording a .wav file. (See “File Format.”)
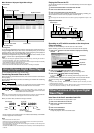
Other Functions of Olympus Digital
Wave Player
Intro Scan of the first 5 seconds of each file
All files in the selected folder are played back in turn.
1 Click on the desired file on the file list.
2 Click on the
button on the tool bar.
Playback starts.
3 Click on the STOP button.
4 Click on the PLAY button.
To stop the playback, click on the STOP button.
Main Window of Olympus Digital Wave Player
To use Olympus Digital Wave Player without connecting the recorder to the PC, or
if Olympus Digital Wave Player does not start automatically when you connect the
recorder to the PC, click on the [Start] button, point to [Programs], select [Olympus
Digital Wave Player] then click on [Digital Wave Player].
To exit Olympus Digital Wave Player, click on the
button on the window, or click
on [File], and then click on [Exit Digital Wave Player].
Notes
• When you start Olympus Digital Wave Player for the first time by connecting the recorder to
the PC after installation, it may take a few minutes to start.
• You cannot operate the buttons and controls on the recorder except for microphone-sensitivity
switch while the recorder is connected to the PC.
• Do NOT use any USB cable other than the one supplied.
• Do NOT disconnect the USB cable before file transfer or recording is completed.
Using Olympus Digital Wave Player
For more detailed instructions, refer to Online Help.
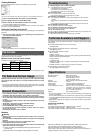
Transferring Recorded Files to the PC
Before transferring recorded files to the PC, make sure the recorder is connected to
the PC properly.
Olympus Digital Wave Player provides the following two methods for transferring
files to the PC.
Transferring all folders
Press . , All files in the recorder are transferred to the PC’s folders whose
names are the same as the folder names in the recorder.
Transferring a selected folder
Press , , or . , All files in the selected folder in the recorder are
transferred to the PC’s folder whose name is the same
as the folder name in the recorder.
Note
Folders A, B, and schedule folder have been prepared on the PC in advance. The date subfolders
for each date are automatically created together with the schedule folder transfer.
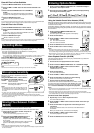
When you transfer files, the filenames change as follows.
* The file number of the transferred file is renumbered automatically and will differ
from the original file on the recorder.
Notes
• You cannot transfer one file at a time.
• Transfer time may vary depending on the recording mode of a file and PC’s performance.
• You cannot upload files from the PC to the recorder.
• You cannot transfer a file that has the same recording time and date as a file already in the
corresponding folder on the PC.
• To transfer files, 20MB or more of the hard-disk space is necessary to assure stable performance
of the PC.
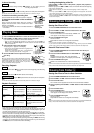
Schedule folder
Menu bar
Recording window button
Tool bar Playback controller
Recording folder
Recorder folder window Sound file list
Audio folder window
Volume control
Rewind button
STOP button
PLAY button
Fast Forward button
Position
Length
Time axis
Adjust time axis
Pause button
Close button
Record button
Stop button
DW A0001A001
Folder
name
File number Prefix added to
the file in the PC
Folder name
File
number*
In the recorder On the PC