


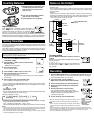
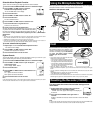

Using the Microphone Stand
When you place the recorder on a desk, etc. during recording, attach the supplied
microphone stand to reduce unwanted vibration in the recorder.
Attach the microphone stand
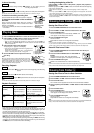
Hold
Set the HOLD switch to the HOLD position.
All operation buttons are disabled. This
feature is useful when the recorder has to be
carried in a handbag or pocket. Remember
to reset the HOLD switch before
attempting to use the recorder.
Notes
• The recorder functions as follows with the HOLD
switch set to the HOLD position:
– If the recorder is stopped, the display goes dark.
– If the recorder is playing, the display goes dark
when playback of the current file has completed.
– If the recorder is recording, the display goes dark
when the recorder stops recording automatically
upon running out of free memory.
• When the display is dark because the HOLD
switch is set to the HOLD position, you can make the clock flash for 2 seconds by pressing any
button.
• You can operate the following button and control while the HOLD switch is set to the HOLD
position;
– MICSENSE switch for selecting the microphone sensitivity
– VOLUME control for adjusting the volume
• The alarm will sound at the scheduled time even if the recorder is set to HOLD. The recorder
will then begin to play the file associated with the alarm once you press any button.
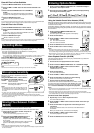
Resetting the Recorder (CLEAR)
This also resets the current time and other settings to their
initial status.
1 Holding STOP button pressed, press and hold the
ERASE button for 2 seconds or longer.
“CLEAR” and “YES” appear alternately on the display for
8 seconds.
2 Press and hold the ERASE button again within 4
seconds.
All files in all folders are erased, and the recorder is reset to its default
settings.
Note
If you leave the recorder untouched for 8 seconds or longer before you press the ERASE button
in Step 2, Clear mode will be canceled, and the recorder will enter Stop mode.
Microphone
stand
Schedule Alarm Playback Function
This is useful for reviewing your daily appointments and remainders.
1 Press and hold the MENU/FOLDER button for 1 second or longer.
2 Press the 9/+ or 0/– button to select the
Schedule Alarm Playback Setup screen.
“S” and “ALARM” flash on the display.
3 Press the PLAY button.
4 Press the 9/+ or 0/– button to select “On.”
5 Press the PLAY button.
The hour indicator flashes.
6 Press the 9/+ or 0/– button to select the hour.
7 Press the PLAY button to register the hour.
Continue to set the minute.
8 Set the minute and press the STOP button.
An alarm will sound at the scheduled time for 5 minutes. Press
any button other than the DISPLAY or REC MODE button while
the alarm is sounding to play back all files recorded in the day’s
date subfolder. To stop schedule alarm playback, press the
STOP button.
Notes
• The alarm tone stops automatically if no button is pressed within 5 minutes after the alarm
starts. The files recorded for the current date are not played back in this case.
• Schedule alarm playback occurs every day unless it is set to OFF.
• Even if no file is recorded in the day’s date subfolder, the beeps will sound. In such a case, no
sound is heard even if you press some button while the alarm is sounding.
To cancel schedule alarm playback
1 Repeat steps 1 to 3 in “Schedule Alarm Playback Function.”
“On” flashes on the display.
2 Press the 9/+ or 0/– button to select “OFF.”
Schedule alarm playback is canceled.
3 Press the STOP button to close the menu.
System Sounds
The recorder beeps to alert you to button operations or warn you of errors. If you
wish to disable the system sounds, proceed as follows:
1 Press and hold the MENU/FOLDER button for 1 second or longer.
2 Press the 9/+ or 0/– button to open the System
Sound Setup screen.
On the display, “bEEP” flashes.
3 Press the PLAY button.
4 Press the 9/+ or 0/– button to choose between “On”
and “OFF.”
On: System sounds are enabled.
OFF: System sounds are disabled.
5 Press the STOP button to close the menu.
Note
If the alarm playback function or the schedule alarm playback function has been set, the alarm
will sound at the scheduled time even if the system sounds are disabled.
aAlarm indicator