


Page 15
The module supports the three levels of Authentication and Encryption (Security Levels) for User 1 and
User 2; noAuthNoPriv, authNoPriv and authPriv. noAuthNoPriv uses username for authentication,
authNoPriv provides authentication based on the HMAC-MD5 algorithm and authPriv provides
DES 56-bit encryption based on the HMAC-MD5 algorithm.
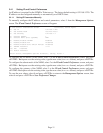
To set User 1 security, select 10 at the SNMP Preferences screen, press <ENTER> and then follow the
screen prompts. To set the User 2 security, select 13 at the SNMP Preferences screen, press <ENTER> and
then follow the screen prompts.
To set User 1 privacy password, select 11 at the SNMP Preferences screen, press <ENTER> and then
follow the screen prompts. To set the User 2 privacy password, select 14 at the SNMP Preferences screen,
press <ENTER> and then follow the screen prompts.
To set User 1 authentication password, select 12 at the SNMP Preferences screen, press <ENTER> and
then follow the screen prompts. To set the User 2 authentication password, select 15 at the SNMP Preferences
screen, press <ENTER> and then follow the screen prompts.
To save the new values, select 0 and press <ENTER> to return to the Management Options screen, then
select 6 and press <ENTER> to Save Preference Changes.
Community name and User name can be any 1-32 character alphanumeric string
Authentication Password and Privacy Password can be any 1-16 character alphanumeric string.
3.4.2.3 Setting the SNMP Trap IP Host Addresses
SNMP traps are used to report events that occur during the operation of a network, and may require the
attention of the network administrator. The NMM is capable of sending SNMP traps to up to eight different
SNMP Traphosts.
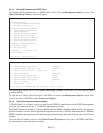
To enter the IP address of the first Traphost Address, select 4 at the Management Options screen to access
the SNMP Preferences screen. Select 16 at the SNMP Preferences screen and press <ENTER>. Then
backspace over the existing value, type the new value (in x.x.x.x format), and press <ENTER>. To enter
the IP addresses of additional trap-receiving Traphost Addresses, repeat this process for Traphost Addresses
2-8 (menu options 17-23).
To save the new values, select 0 and press <ENTER> to return to the Management Options screen, then
select 6 and press <ENTER> to Save Preference Changes.
The NMM collects all traps from modules installed in the chassis and reports them to the configured
SNMP Trap Host. The NMM also has the capability to report, in the event of a loss of power, a Dying Gasp
Trap to the SNMP Trap Host (feature supported on NMM with production date of 1/1/2009 or later).
3.4.2.4 Enabling/Disabling SNMPv1/v2c Agent
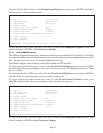
To disable/enable SNMPv1/v2c agent, select 4 at the Management Options screen to access the SNMP
Preferences screen. Select option 6 to disable/enable SNMPv1/v2c agent. When disabled, the module
will not respond to any requests via the SNMPv1/v2c protocol.
3.4.2.5 Enabling/Disabling SNMPv3 Agent
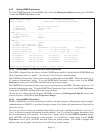
To disable/enable SNMPv3 agent, select 4 at the Management Options screen to access the SNMP
Preferences screen. Select option 7 to disable/enable SNMPv3 agent. When disabled, the module will not
respond to any requests via the SNMPv3 protocol.
Note: Both SNMPv1/v2c and SNMPv3 agents can be enabled at the same time.