


Optoma BX-AL133B User Manual and Installation Guide, Version 1.0, copyright Nov, 2008, all rights reserved, Panamorph Inc.
Page 3
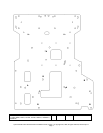
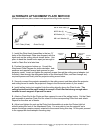
USING the AKPro ATTACHMENT KIT
The AKPro includes a high performance, rigid, solid steel plate specifically designed to attach to
a properly installed model RPA ceiling mount head made by Chief Manufacturing, which may
then be further installed to the ceiling using a variety of standard Chief components. These
components are not included in the kit but are available from most qualified home theater
installers. The RPA and associated hardware must be installed to ceiling structural
members to support at least 250 pounds and must be extremely rigid. Any play in the
RPA mount will result in a rocking of the AKPro assembly as the lens moves in and out
of the projector beam and represents a danger to equipment and personnel.
The AKPro Attachment kit may also be used with a projector mount from another manufacturer
apart from Chief. If you wish to use a different projector mount the lens system is stabilized by
using two chains extending from the front area of the plate to ceiling attachment points. You
may skip ahead to Page 6 and the section titled: “
Alternate Attachment Plate Method”
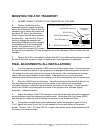
IMPORTANT CEILING MOUNT LOCATION CONSIDERATIONS
For optimum imaging results consult your projector’s instructions for the ceiling mount location
to place the projector’s lens in the horizontal center (ie left to right) of your projection screen
(even if your projector has a horizontal lens/image shift capability). In addition, make sure you
are not at the limits of your projector’s zoom capability so that you have some range for image
adjustments.
The AKPro attachment plate is designed so that the projector and other attached components
form an average center of mass (gravity) approximately located at the center of the ceiling
mount pipe. Therefore, the ideal ceiling mount location will be shifted by the AKPro 2”
(50mm) toward the left side of the screen from the ceiling mount location indicated by your
projector’s instructions.
If your projector ceiling mount is already installed and you do not wish to move it (or similarly
move the screen in the opposite direction) due to a shift by the AKPro system, then you can
make fine horizontal shift adjustments to your projector (if available) combined with turning the
projector (only as necessary) during final setup to compensate for the shift. Some small amount
of image distortion (horizontal keystoning) may result but in most cases this will not be
noticeable since the image edges will typically be masked by the screen borders.
WARNING!
Use extreme caution and appropriate hardware when installing heavy objects to a
ceiling. Periodically check all fasteners and connection hardware to be sure they are
not coming loose. Improper installation may lead to an increased risk of your
equipment becoming unstable and possibly injuring someone.