


Optoma BX-AL133B User Manual and Installation Guide, Version 1.0, copyright Nov, 2008, all rights reserved, Panamorph Inc.
Page 6
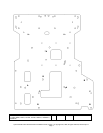
ALTERNATE ATTACHMENT PLATE METHOD
(Phillips screwdrivers, pliers, scissors and appropriate ceiling hooks required)
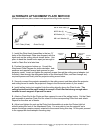
1. Install the Plate Hook Assemblies in the two “H”
holes of the Attachment Plate (see diagram) with the
hook ends on the ceiling side as shown above. Use
pliers to bend the closed hooks apart just enough to
install a Chain End at a later time.
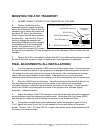
2. Position the projector bottom-up. Consult the
Attachment Plate Diagram for plate orientation, hole
positions and required screws and spacers for your
projector model. Insert and tighten the required screws through the ceiling mount adapter (not
included), then through the designated holes of the Attachment Plate, and then through any
required spacers and finally into the projector ceiling mount holes
3. Securely connect the projector assembly to the ceiling mount and then adjust the projector
and ceiling mount to center the projector's image in the horizontal center of your screen.
4. Install ceiling hooks (not supplied) into the ceiling directly above the Plate Hooks. The
ceiling hooks should be small enough to accept a Chain End but strong enough when
installed to each support 40 pounds or more.
5. Attach a Chain End to the Chain and then connect to one of the ceiling hooks. Cut the Chain
and assemble to another Chain End for a best fit to the corresponding Plate Hook and attach.
Repeat for the other set of hooks.
6. Adjust and tighten the nuts on the Plate Hook Assemblies to make the Chains tight but
without raising the front of the Attachment Plate. You may wish to turn the projector on to
ensure the image remains properly oriented to the screen during this step. At this point proceed
to the appropriate lens/transport mounting step.
Plate Hook Bag Contents (AK6 only)
3/16” Chain (6 feet)
Chain End (4)
Plate Hook
as assembled to
Attachment Plate
#8
-
32 Wi
re Hook (2)
#8
-
32 Nut (4)
#8 Washer (4)
M4 Lock Washer (2)
Ceiling
side
Attachment
Plate
Ceiling Mount
adapter
Attachment
Screws
Spacers