


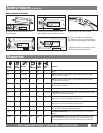

6
USA & Canada (800) 472-5555 • (707) 283-5900 • Fax (707) 283-5901
5. Windows will recognize your UPS as “New Hardware”.
6. Insert the software disk into the computer’s drive. The instal-
lation program should start automatically. If the installation pro-
gram does not start automatically, open it manually with the
Window’s “Run” command.
7. Follow the on-screen instructions.
8. Once the software is installed, remove the disk and restart
your computer.
For Windows 2000
1. Click on Start, point to Settings then click Control Panel.
2. Double-click on Power Options.
3. On the UPS Tab, click Select.
4. In the UPS Selection Dialog Box, under Manufacturers,
click None.
5. Exit to the desktop.
6. Shutdown the computer.
7. Turn the UPS off and unplug it.
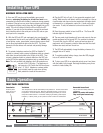
8. Connect the serial interface cable to the UPS and an open
serial port on the back of the computer. (Note: You must use
the serial cable that was supplied with the unit).
9. Plug the UPS into an AC outlet, turn the UPS on and start
your computer.
10. Windows will recognize your UPS as “New Hardware”.
11. Insert the software disk into the computer’s drive. The
installation program should start automatically. If the installation
program does not start automatically, open it manually with the
Window’s “Run” command.
12. Follow the on-screen instructions.
13. Once the software has finished installing, remove the disk
and restart your computer.
For Windows NT 4.0
1. Click on Start, point to Settings then click Control Panel.
2. Double-click on the UPS Icon.
3.. Remove the check mark from the box labeled UPS is installed
on.
4. Click OK.
5. Acknowledge the message that the UPS is in an unknown
state.
6. Exit to the desktop.
7. Shutdown your computer.
8. Turn the UPS off and unplug it.
9. Connect the serial interface cable to the UPS and an open seri-
al port on the back of the computer. (Note: You must use the
serial cable that was supplied with the unit).
10. Plug the UPS into an AC outlet, turn the UPS on and then
start your computer.
11. Click on Start, point to Settings then click Control Panel.
12. Double-click on Add/Remove Programs.
13. Insert the software disk into the computer’s drive. The
installation program should start automatically. If the installation
program does not start automatically, open it manually with the
Window’s “Run” command.
14. Click Install.
15. Follow the on-screen instructions.
16. Once the software is installed, remove the disk and restart
your computer.
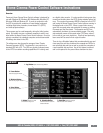
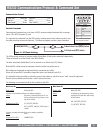
When your computer restarts, the Home Cinema Power Control
software will appear on your screen for a few seconds, and then
minimize. It will appear as a blue and white batter
y icon located
in the system tray, near the clock.
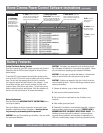
Home Cinema Power Control Software
(continued)