


9-8
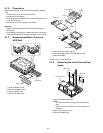
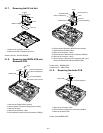
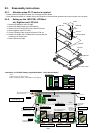
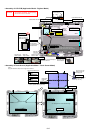
3. Display unit is half-rotated and removes the 2 Screws
<N9>.
4. Remove the 4 Screws <N18>.
5. Turn the computer over.
6. Remove the Display Unit.
Screws <N1> : DFHE5025XA
Screws <N9> : DRSB2+5FKL
Screws <N18> : DXYN4+J7FNL
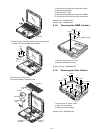
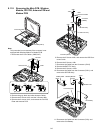
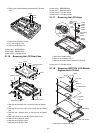
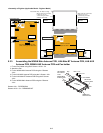
9.1.16. Removing the LCD Rear Case
1. Remove the 6 Screws <N7> on the front side of Display
unit.
2. Remove the 6 Screws <N7> on the back side of Display
unit.
3. Remove the 2 Screws <N4> on the top side of Display
unit.
4. Remove 2 Antenna Covers and Tablet Latch Cover.
5. Remove the 10 Screws <N15>.
6. Remove the 2 Screws <N16>.
7. Remove the LCD Rear Case.
Screws <N4> : DRHM5054XA
Screws <N7> : DRQT26+E5FKL
Screws <N15> : DXYN2+J6FNL
Screws <N16> : DXYN3+J10FNL
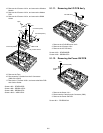
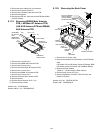
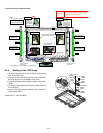
9.1.17. Removing the LCD Hinge
1. Remove the Cable Holder.
2. Remove the 2 Screws <N17>.
3. Remove the Cable Holder Plate and LCD Hinge.
Screws <N17> : DXYN3+J8FNL
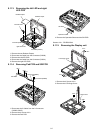
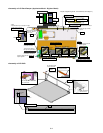
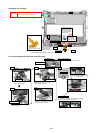
9.1.18. Removing LED PCB, LCD Module,
Digitizer and LCD Unit
1. Remove the 2 Sheet and Tape.
<N18>
<N18>
<N18>
<N18>
<N15>
<N15>
<N15>
<N15>
<N15>
<N16>
<N16>
<N15>
<N15>
<N15>
<N15>
<N15>
<N7>
<N7>
<N7>
<N7>
<N7>
<N7>
Antenna Cover
Tablet Latch Cover
LCD Rear Case
Antenna Cover
<N7>
<N7>
<N4>
<N4>
<N7>
<N7>
<N7>
<N7>
<N17>
<N17>
LCD Cable
Holder
Sheet
Cable
Holder
Cable
Holder
Cable
Holder
Plate
Cable Holder
Plate
Cable
Holder
Plate
LCD
Hinge
Sheet
LCD Back Plate
Digitizer
<E36-15>
<E36-15>
Sheet
LED PCB
Tape
LCD Unit
LED Module
LED Plate Holder