


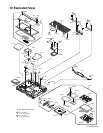

9-32
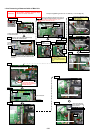
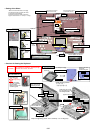
n Putting of the Sheet
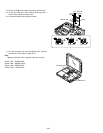
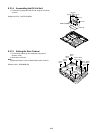
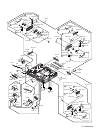
n Cautions for Setting the Keyboard
0~0.5mm
0~0.5mm
0~0.5mm
0~0.5mm
0~0.5mm
0~0.5mm
3~5mm
0~1mm
Tape
Click Button Plate
TP Tape
Gasket E
KB CNT Hole Cushion
LCD Cushion Sheet LCD Cushion Sheet
Palmrest Waterproof Sheet L
KBD Waterproof Sheet C
*Because the sheets described on this page
are waterproof sheets, the whole part should
be put pressure after attaching.
(Put pressure around the sheet in particular.)
Apply the load to attach. 30 ~ 40N (3.0 ~ 4.0 Kgf)
Fit to
the rib.
Fold.
Attach to
the rib.
Fold.
Photo
Attaching details of Tape
Attach it
using
the JIG.
Ensure it does not come
over the end of the rib.
Ensure it does not come
over the end of the rib.
The paste should
be put the left side.
Fit to the wall of the end side, and put
Fit to the wall of the end side, and put
the surplus to the Cabinet side.
the surplus to the Cabinet side.
Fit to the wall of the end side, and put
the surplus to the Cabinet side.
Avoid running over the rib.
Match to the circles.
Match to the circles.
Match to the circles.
0~0.5mm
0~0.5mm
Avoid coming over.
Avoid coming over.
Avoid running over.
Avoid running over.
0.5~1mm
0.5~1mm
0~0.5mm
Avoid coming over.
Avoid running over.
Avoid running over.
Avoid running over.
Avoid running over.
0.5~1mm
*Avoid running over.
0.5~1mm
0.5~1mm
0~0.5mm
0~0.5mm
0~0.5mm
0~0.5mm
0~0.5mm
0~0.5mm
0~0.5mm
0~0.5mm
*Avoid running over.
*Avoid running over.
0.5~1mm
0~0.5mm
0~0.5mm
0~0.5mm
0~0.5mm
*Avoid running over.
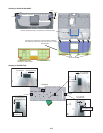
Attach it using the jig.
Fold over the front and attach it.
Fold over the front and attach it.
Attach it using the jig.
Palmrest Waterproof Sheet R
0.5~1.5mm
0.5~1.5mm
0.5~1.5mm
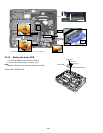
Tighten inside first.
㽲㸢㽳㸢㽴
㸢㽵㸢㽶㸢㽷㸢㽸
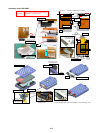
KBD CNT LID Ass'y
KBD CNT LID Ass'y
4䌾7mm
Tighten inside first.
KB CNT LID Sheet
KB CNT LID
KBD Plate(L)
KBD Plate(R)
Gasket
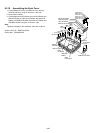
Screw
Ԝ
Screw
ԛ
Screw
ԝ
Screw
Ԟ
Screw
Ԙ
Screw
Ԛ
Screw
ԙ
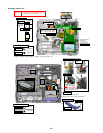
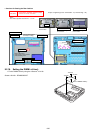
Insert positions of
LCD Cable/KBD FFC
Connect the Connector
to the dotted part.
Hold the Connector
part when connecting
/ disconnecting.
Never bend at the foot
of stiffening plate.
Insert position
of KBD FFC.
Incline to the right.
Incline to the right.
Avoid running over
the Top Case.
Insert the KBD FFC.
Lock the connector
after inserting FFC.
Confirm the LCD Rear
side is at front when
processing the wire.
Insert the KBD FFC.
Set using the jig.
Use the jig.
Apply the load to attach. 30~40N(3.0~4.0Kgf)
Attach to the inside
the groove.
Avoid running over.
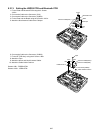
Rotate the LCD to make
the LCD display face front
after setting the KBD.
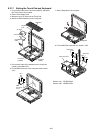
Before attaching 2 and 3,
Before attaching 2 and 3,
press the two-sided tape press the two-sided tape
parts (4 positions). parts (4 positions).
:30N(3.0Kgf):30N(3.0Kgf)
Before attaching 2 and 3,
press the two-sided tape
parts (4 positions).
:30N(3.0Kgf)
Note
㶎
To avoid
wiring damage
KBD Ass'y
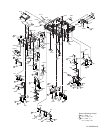
<Order of fixing screws>
CAUTION
S1:Insulation S2:Bitten S3:Sharp Edge
S4:Part No. Check S5:Other
Torque of tightening screw :0.2 ± 0.02N·m(Ṑ2.0 ± 0.2kgf·cm)
S5