


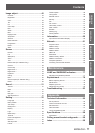


About Your Projector
ENGLISH -
19
Preparation
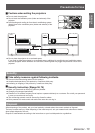
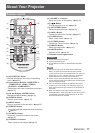
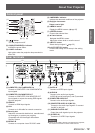
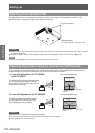
Control panel
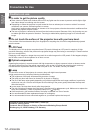
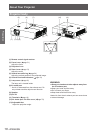
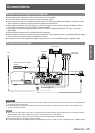
(1) COMPUTER 1 IN/ COMPONENT IN
Connect to COMPUTER 1 IN/ COMPONENT IN
input signals.
(2) COMPUTER 2 IN/
MONITOR OUT
Connect to COMPUTER 2 IN/
MONITOR OUT
input signals or outputs the analog RGB signals
input the projector.
(3) HDMI IN
Connect to HDMI input signals.
(4) LAN
Connect to a LAN cable for network connection.
(5) Security slot
Attach the commercial shackle lock, manufactured
by Kensington, to protect your projector.
Compatible with the Kensington MicroSaver
Security System.
(6) SERIAL IN
Connect to a computer via an RS-232C cable.
(7) VIDEO IN
Connect to VIDEO input signals.
(8) AUDIO IN
Connect to the audio input signals.
AUDIO IN has left and right (L and R) terminals.
(9) COMPUTER AUDIO IN 1
Connect to the audio input signals.
(10) COMPUTER AUDIO IN 2 (MIC IN)
Connect to the audio input signals. Or connect
the MIC to this jack.
(11) VARIABLE AUDIO OUT
Output the audio signals input to the projector.
(12) S-VIDEO IN
Connect to S-VIDEO input signals.
Attention
When a LAN cable is directly connected to the projector,
z
the network connection must be made indoors.
(4) <WARNING> indicator
Indicate the abnormal conditions of the projector.
(5) Daylight view sensor
Detect room's light.
(6) <MENU> button
Display the MENU screen. (
Æ
page 36)
(7) <ENTER> button
Execute the selected item.
(8) ▲▼◄► buttons
Navigate the MENU screen.
Adjust the volume level or mute the sound.
(9) <INPUT> button
Select the input signal. (
Æ
page 32)
(10) <AUTO SETUP> button
Execute the setting of Auto setup in the setting
menu.
(1)
(2)
(3)
(4)
(5)
(6)
(7) (8)
(9)
(1) < > button
Turn the projector on/off.
(2) <ON(G)/STANDBY(R)> indicator
Indicate the power status.
(3) <LAMP> indicator
Light yellow when the projection lamp reaches its
end of life.
(10)
Rear terminals
(4)
(3)(2)
(1)
(10)(9)
(8)
(7)
(6)
(5)
(11)
(12)