


6
INSTALLATION
The installation described below should be made by qualified service personnel or system installers.
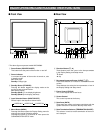
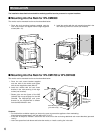
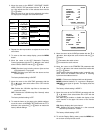
■ Mounting into the Rack for WV-CM2080
The monitor can be mounted into the rack as described below.
P
O
W
E
R
Video
Monitor
W
V
-C
M
20802080
ON
OFF
A
U
D
IO
M
E
N
U
S
T
A
N
D
B
Y
IN
P
U
T
S
E
L
E
C
T
2. Install the monitor with the rack mounting bracket in the
rack securing it with four screws (not included).
1. Place the rack mounting brackets supplied onto the
rear of the monitor and tighten with the eight supplied
screws (M4 x 10).
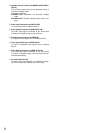
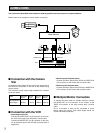
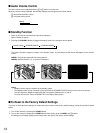
■ Mounting into the Rack for WV-CM1780 or WV-CM1480
The monitor can be mounted into the rack as described below.
1. Place the rack mount bracket supplied
onto the side of the monitor and tighten
with the four supplied screws (M4x12).
2. Install the monitor with the rack mount
bracket in the rack securing it with eight
screws (not included).
* Shown right are the figures of the WQ-
LM140E rack mount bracket for the WV-
CM1480. The WQ-LM170E rack mount
bracket for the WV-CM1780 is different
from the WQ-LM140E in size.
Cautions:
• Do not block the ventilation opening or slots on the cover to prevent the appliance from overheating.
Always keep the temperature in the rack within 45°C (113°F).
• If the rack is subject to vibration, secure the rear of the unit to the rack using additional rack mount brackets (procured
locally).
• Leave one space free both above and below the monitor, or install a cooling fan in the rack.
P
O
W
E
R
Video
Monitor
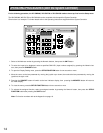
WV-CM
1480
1480
ON
O
FF
A
U
D
IO
M
E
N
U
S
T
A
N
D
B
Y
IN
P
U
S
E
L
E
C
T
M4x12
M4x12
(accessory of
WQ-LM140E/
LM170E)*
Rack Mounting Screws
(procured locally)
EIA Rack