


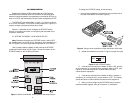
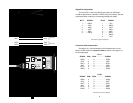

3.2 SETTING THE RTS/CD CARRIER CONTROL JUMPER
The RTS/CD jumper (see Figure 1) is identified as J2 inside the
1012B (see Figure 1). To access this strap, do the following:
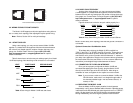
1. Using a small screwdriver, insert the tip into one of the slots in
the side of the Model 1012B (see Figure 2).
2. Rotate the screwdriver as shown in Figure 2 to open the case.
3. The RTS/CD carrier control jumper setting on the 1012B
determines whether the transmitter is constantly on or is controlled by an
RS-232 control signal. When this jumper is removed from the pegs, the
1012B transmitter is constantly on. When the jumper is in place on the
pegs, the transmitter is controlled by either RTS or CD. When the control
signal is a positive voltage, the transmitter is turned on, if negative
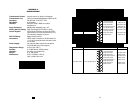
voltage, the transmitter is off. See Table 1 for the correspondence
between DTE/DCE and RTS/CD parameters.
4. The RTS/CD carrier control jumper also controls which signal
will function as the Carrier Detect (CD) signal. If the DTE/DCE switch is
set to “DCE,” the carrier detect is output on Pin 8. If the DTE/DCE
switch is set to “DTE,” the carrier detect is output on Pin 4. Table 2
shows which control signal provides the carrier detect function, per the
DTE/DCE setting.
Note: For multi-point applications, it is necessary to have a jumper
in place on the pegs on the slave modems.
5. After you finish configuring the DTE/DCE switch, snap the
case halves back together and continue the installation process.
DTE/DCE Switch Setting DCE DTE
Carrier Detect Function Carrier detect is output Carrier detect is output
on pin 8 (CD) on pin 4 (RTS)
5
Table 2. Interaction of DTE/DCE switch and RTS/CD jumper
4.0 INSTALLATION
Once you have properly configured the Model 1012B, you are
ready to connect it to your system. This section tells you how to
connect the Model 1012B to the twisted pair and RS-232 interfaces,
and how to operate the Model 1012B.
4.1 HOW TO CONNECT TO THE TWISTED PAIR INTERFACE
The Model 1012B passes data and handshaking signals between
two RS-232 devices at distances to 6 miles (9.7 km) and data rates to
38.4 kbps. There are two requirements for installing the Model 1012B.
1. These units work in pairs. Therefore, you must have one Model
1012B at each end of a two twisted pair interfaces.
2. To function properly, the Model 1012B needs two twisted pair of
metallic wire. They must be unconditioned, dry metallic wire,
unloaded, between AWG 19 and 26 (the higher number gauges
may limit distance somewhat). Standard dial-up telephone
circuits, or leased circuits that run through signal equalization
equipment, are not acceptable.
For your convenience, the Model 1012B is available with the
following twisted pair interfaces: RJ-11 jack, RJ-45 jack, and terminal
blocks.
4.1.1 TERMINAL BLOCK TWISTED PAIR CONNECTION
If your application requires you to connect one or two pair of bare
wires to the Model 1012B, you will need to access the external terminal
blocks. The following instructions will tell you how to connect the bare
wires to the terminal blocks.
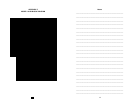
1. Strip the outer insulation from the twisted pairs about one inch
from the end.
2. Strip the insulation on each of the twisted pair wires about
0.25 inch.
6
Figure 4. Stripping the outer insulation from the twisted pairs
DTE/DCE Switch Setting DCE (Default) DTE
RTS/CD jumper in place Carrier activated by Carrier activated by
(default) RTS - pin 4 (default) CD - pin 8
RTS/CD jumper removed Carrier constantly ON Carrier constantly ON
Table 1. Interaction of DTE/DCE switch and RTS/CD strap